> ## Documentation Index
> Fetch the complete documentation index at: https://evolink.ai/docs/llms.txt
> Use this file to discover all available pages before exploring further.
# Pi Coding Agent
> Connect Pi Coding Agent to EvoLink.AI
## Overview
Pi Coding Agent (whose command and config directory name is `pi`) is an open-source, terminal-native coding agent (a command-line tool) from [Earendil Works](https://github.com/earendil-works/pi). It supports multiple model providers, custom providers, and pluggable tools, making it well-suited for code assistance and task automation from the command line.
Pi supports custom model providers and the **Anthropic Messages API**. By configuring EvoLink as a custom provider in `~/.pi/agent/models.json`, you can use EvoLink's Claude model family in Pi while retaining Pi's complete agent tool-calling capabilities.
Pi's official focus is the **terminal CLI** (four run modes: interactive / print / RPC / SDK), and this guide follows the CLI.
## Before You Begin
Before starting the configuration, make sure you have completed the following preparations:
### 1. Install the Pi Coding Agent CLI
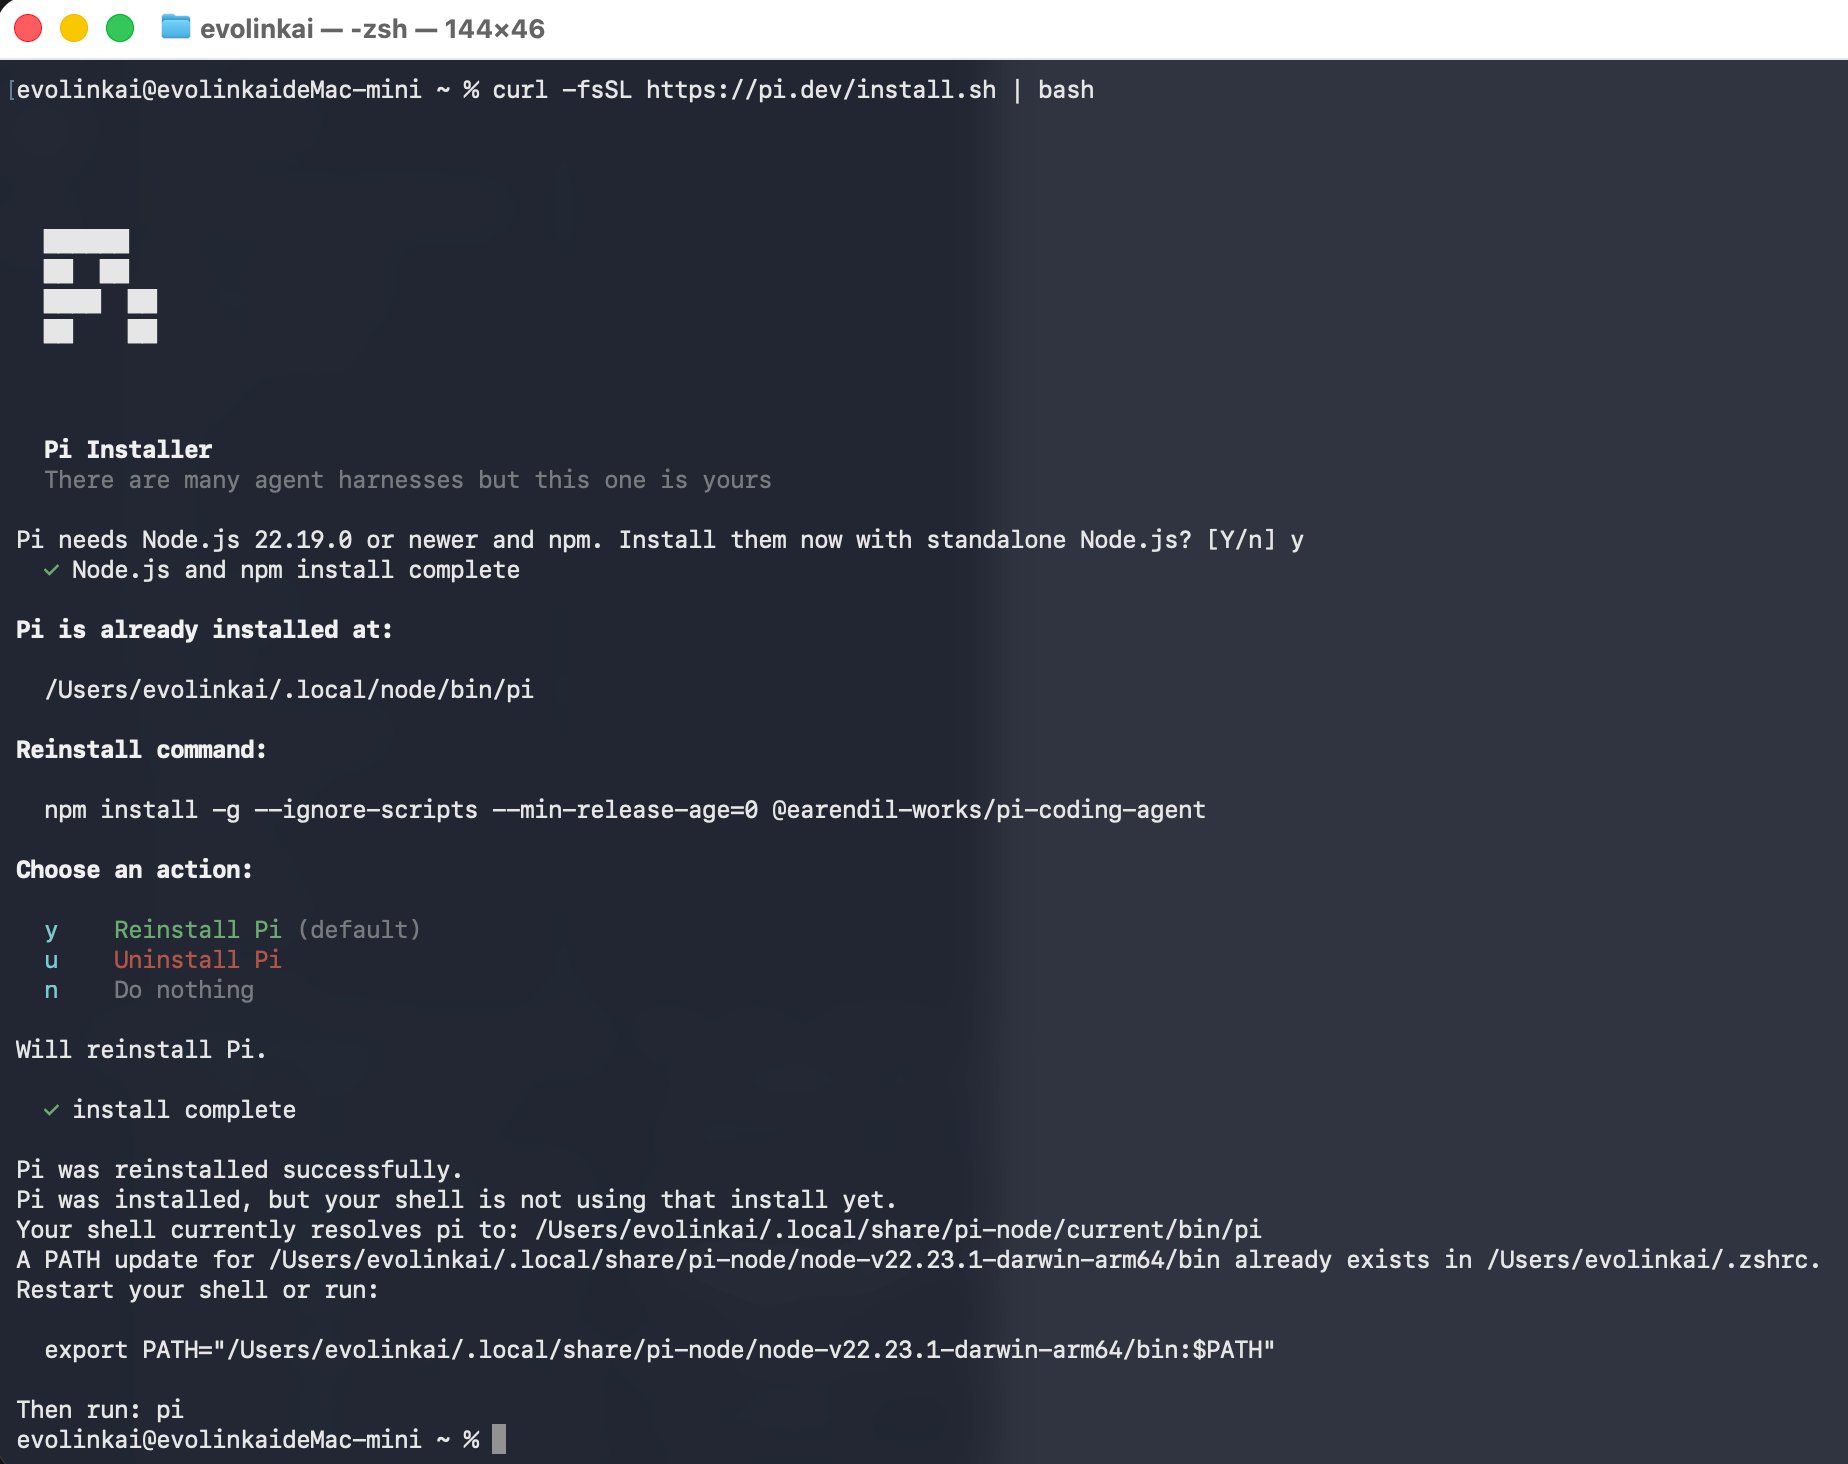
Pi requires **Node.js ≥ 22.19.0**. First check your version with `node -v`; below this version, `npm install -g` will report `EBADENGINE`, so upgrade Node first.
```bash theme={null}
curl -fsSL https://pi.dev/install.sh | bash
```
 ```bash theme={null}
npm install -g --ignore-scripts @earendil-works/pi-coding-agent
```
```bash theme={null}
npm install -g --ignore-scripts @earendil-works/pi-coding-agent
```
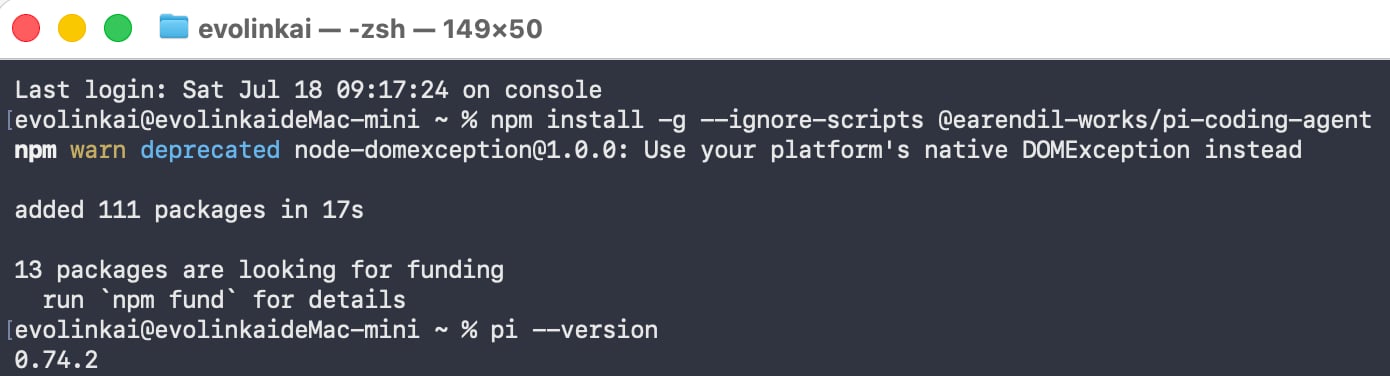 If you see a **deprecation warning** during installation such as `npm warn deprecated node-domexception@1.0.0`, you can safely ignore it — it comes from an upstream dependency and does not affect installation or usage. As long as you see `added N packages` at the end and `pi --version` prints a version number, the install succeeded.
The official install command includes `--ignore-scripts` (which skips dependencies' lifecycle scripts during installation; Pi's normal installation doesn't need them). On first run, Pi automatically downloads native tools such as ripgrep and fd as needed.
Make sure you get the package name `@earendil-works/pi-coding-agent` right — npm also has a same-named fork `@oh-my-pi/pi-coding-agent` (a different version line) and the deprecated `@mariozechner/pi-coding-agent` (whose maintainer has noted you should switch to the earendil-works version). Don't install the wrong one.
Once installation is complete, confirm the `pi` command is available:
```bash theme={null}
pi --version
```
For more installation methods (PowerShell, pnpm, bun, etc.), see the [Pi website](https://pi.dev) and the [official repository](https://github.com/earendil-works/pi).
### 2. Get an EvoLink API Key
* Log in to the [EvoLink console](https://evolink.ai/dashboard)
* Find API Keys in the console, click the "Create New Key" button, then copy the generated key
* The API Key usually starts with `sk-`. Please keep it safe.
## Step 1: Configure the EvoLink Provider
Pi defines providers and models through a config file named `models.json`, located in the `.pi/agent/` folder inside your home directory (full path `~/.pi/agent/models.json`). Claude models frequently use `tool_use` / `tool_result` in Pi, so this guide uses EvoLink's **Anthropic Messages-compatible API** and configures it as a custom provider of type `anthropic-messages`.
`~` stands for your **home directory** (`/Users/your-username` on macOS, `/home/your-username` on Linux). `.pi` starts with a dot, making it a **hidden folder** that Finder / File Explorer won't show by default — so the easiest way to create the file below is via the command line. Just copy and paste.
This file does **not** exist by default (the `.pi` folder usually isn't created until Pi runs), so you need to create it manually. Follow these three steps:
* **macOS**: Press `Command + Space` to open Spotlight, type `Terminal`, and press Enter.
* **Windows**: Search for `PowerShell` in the Start menu and open it.
If you're new to the command line, see [FAQ - How do I open a command-line terminal?](#how-do-i-open-a-command-line-terminal) first.
Paste the following command into the terminal and press Enter. It automatically creates the needed folder and opens an empty `models.json` in a text editor:
```bash theme={null}
mkdir -p ~/.pi/agent && nano ~/.pi/agent/models.json
```
This drops you into the `nano` editor (a simple text editor inside the terminal).
```powershell theme={null}
mkdir -Force "$HOME\.pi\agent"; notepad "$HOME\.pi\agent\models.json"
```
Notepad will ask "Do you want to create a new file?" — click **Yes**.
Copy the **complete configuration** below and paste it into the editor you just opened:
```json theme={null}
{
"providers": {
"evolink": {
"name": "EvoLink Direct",
"baseUrl": "https://direct.evolink.ai",
"apiKey": "$EVOLINK_API_KEY",
"authHeader": true,
"api": "anthropic-messages",
"models": [
{ "id": "claude-fable-5", "reasoning": true, "contextWindow": 1000000, "maxTokens": 128000,
"cost": {"input": 9.0, "output": 45.0, "cacheRead": 0.9, "cacheWrite": 11.25} },
{ "id": "claude-sonnet-5", "reasoning": false, "contextWindow": 1000000, "maxTokens": 64000,
"cost": {"input": 2.7, "output": 13.5, "cacheRead": 0.27, "cacheWrite": 3.375} },
{ "id": "claude-haiku-4-5-20251001", "reasoning": false, "contextWindow": 200000, "maxTokens": 64000,
"cost": {"input": 0.9, "output": 4.5, "cacheRead": 0.09, "cacheWrite": 1.125} }
]
}
}
}
```
Then save:
* **nano (macOS / Linux)**: Press `Control + O` then Enter to save, then `Control + X` to exit.
* **Notepad (Windows)**: Press `Control + S` to save, then close the window.
**Key field descriptions (don't skip any):**
* **`api: "anthropic-messages"`** — uses EvoLink's Anthropic Messages-compatible route, so Pi uses Claude's native `tool_use` / `tool_result` protocol.
* **Set `baseUrl` only to the domain root** `https://direct.evolink.ai` — do **not** manually add `/v1` or `/v1/messages`. Pi appends `/v1/messages` automatically; adding it manually duplicates the path and causes a `404 Invalid URL`.
* **`authHeader: true` is required.** Pi's Anthropic SDK uses `x-api-key` by default, while EvoLink's `/v1/messages` expects `Authorization: Bearer `. This field makes Pi send the correct Bearer authentication header.
* **`apiKey` has two forms — pick one:**
* **Option 1 · Paste the key directly (simplest, good for local personal use)**: replace `"$EVOLINK_API_KEY"` in the config with your real key, e.g. `"apiKey": "sk-your-real-key"`. Done in one step, no environment variable needed; the downside is the key sits in **plaintext** in the config file, so don't share this file or commit it to Git.
* **Option 2 · Environment variable interpolation (more secure, recommended)**: keep `"$EVOLINK_API_KEY"` as is and put the real key in an environment variable (see "Set the API Key Environment Variable" below). This keeps the plaintext key out of the config file.
* **(Advanced)** Pi's `apiKey` also supports `${EVOLINK_API_KEY}` (equivalent; use braces to disambiguate when the variable name is immediately followed by literal text) and `!command` (a leading `!` runs a command and uses its output as the key, for example reading from a password manager: `"!op read 'op://vault/item/credential'"`). If you need a literal `$` or `!` in the value, escape them as `$$` and `$!`.
Don't want to touch the key in the config file? You can also use `/login` in interactive mode to select this provider and store the key in `~/.pi/agent/auth.json` — the effect is equivalent.
### Set the API Key Environment Variable
You only need this step if you chose **Option 2 (environment variable interpolation)** above. If you chose **Option 1 (paste the key directly)**, the key is already in the config file — skip this section and go straight to Step 2.
Point the `$EVOLINK_API_KEY` referenced in the configuration above to your real key. Below are both the **temporary** version (only valid in the current terminal window; gone once you close it — good for a first test run) and the **persistent** version (loaded automatically every time you open a terminal):
**Temporary** (current terminal window; lost when closed):
```bash theme={null}
export EVOLINK_API_KEY=your_EvoLink_API_Key
```
**Persistent** (written to your shell config file; applied automatically in every new terminal):
```bash theme={null}
# If you use zsh (the default on modern macOS)
echo 'export EVOLINK_API_KEY=your_EvoLink_API_Key' >> ~/.zshrc
source ~/.zshrc
# If you use bash
echo 'export EVOLINK_API_KEY=your_EvoLink_API_Key' >> ~/.bashrc
source ~/.bashrc
```
Not sure which shell you're using? Run `echo $SHELL` in the terminal — if the output contains `zsh`, use `~/.zshrc`; if it contains `bash`, use `~/.bashrc`.
**Temporary** (current PowerShell window; lost when closed):
```powershell theme={null}
$env:EVOLINK_API_KEY = "your_EvoLink_API_Key"
```
**Persistent** (written to user environment variables; applied in all new windows):
```powershell theme={null}
setx EVOLINK_API_KEY "your_EvoLink_API_Key"
```
`setx` **does not affect the current window**; **restart your terminal** (close and reopen PowerShell) for it to take effect.
## Step 2: Start Using and Verify
### 1. Select a Model
Run the following command in your terminal to launch Pi:
```bash theme={null}
pi
```
Inside the Pi session, enter `/model` to open the model selector, then choose the EvoLink model configured above (such as `claude-fable-5`).
### 2. Verify the Configuration
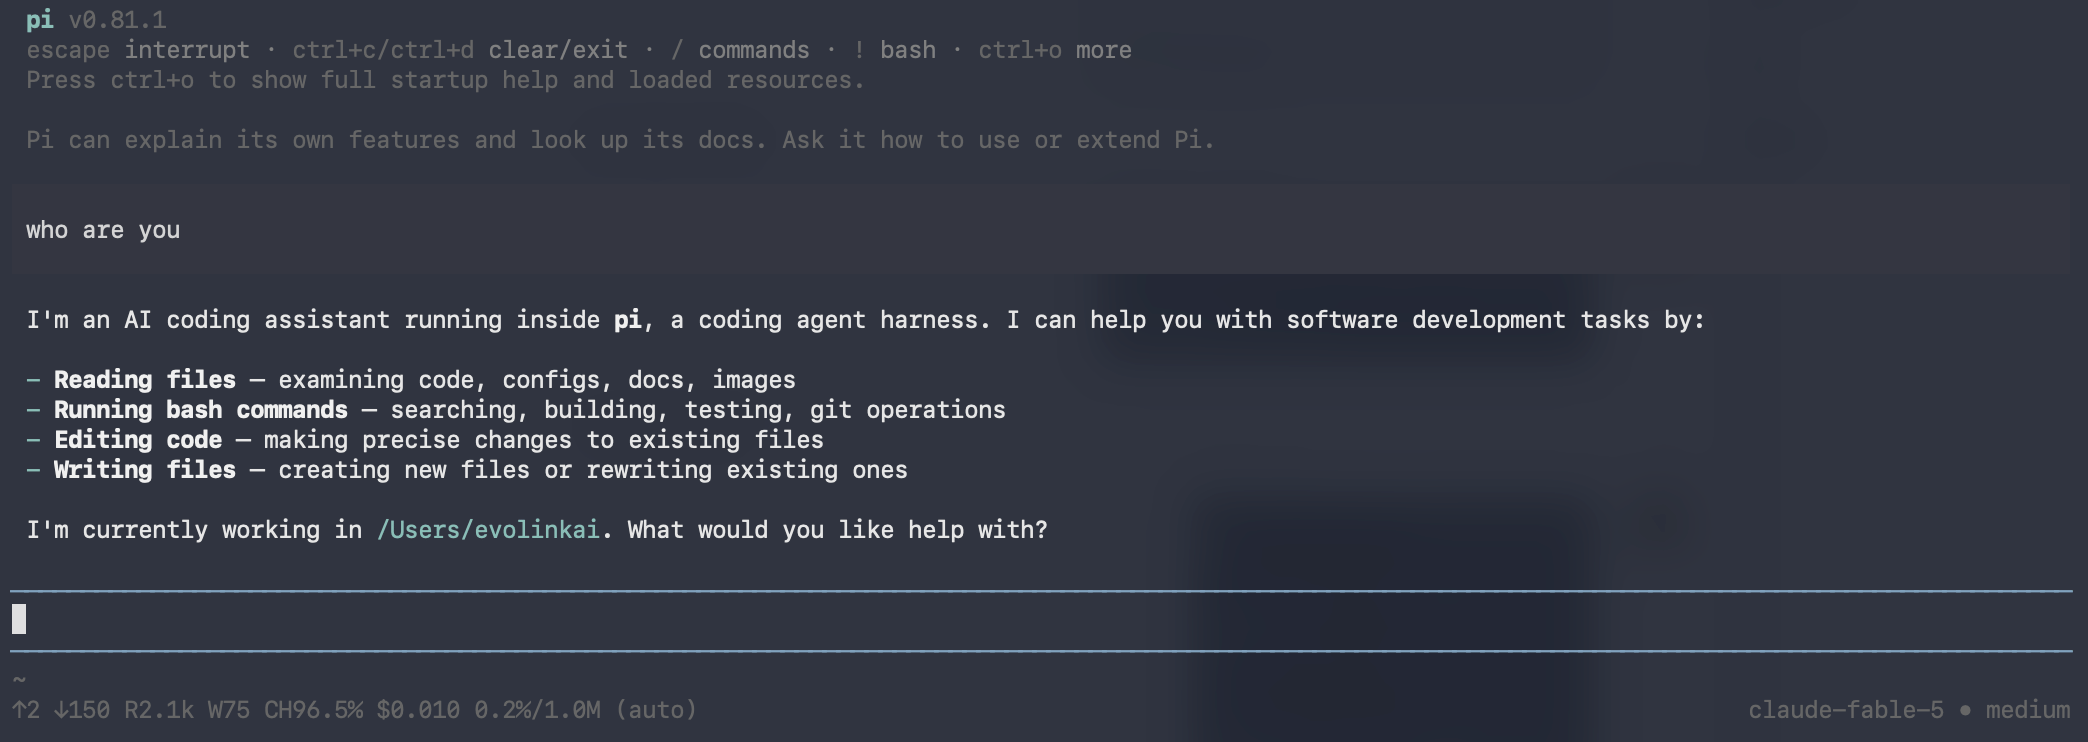
After selecting a model, first enter a simple prompt to verify the model response:
```
who are you
```
If you see a **deprecation warning** during installation such as `npm warn deprecated node-domexception@1.0.0`, you can safely ignore it — it comes from an upstream dependency and does not affect installation or usage. As long as you see `added N packages` at the end and `pi --version` prints a version number, the install succeeded.
The official install command includes `--ignore-scripts` (which skips dependencies' lifecycle scripts during installation; Pi's normal installation doesn't need them). On first run, Pi automatically downloads native tools such as ripgrep and fd as needed.
Make sure you get the package name `@earendil-works/pi-coding-agent` right — npm also has a same-named fork `@oh-my-pi/pi-coding-agent` (a different version line) and the deprecated `@mariozechner/pi-coding-agent` (whose maintainer has noted you should switch to the earendil-works version). Don't install the wrong one.
Once installation is complete, confirm the `pi` command is available:
```bash theme={null}
pi --version
```
For more installation methods (PowerShell, pnpm, bun, etc.), see the [Pi website](https://pi.dev) and the [official repository](https://github.com/earendil-works/pi).
### 2. Get an EvoLink API Key
* Log in to the [EvoLink console](https://evolink.ai/dashboard)
* Find API Keys in the console, click the "Create New Key" button, then copy the generated key
* The API Key usually starts with `sk-`. Please keep it safe.
## Step 1: Configure the EvoLink Provider
Pi defines providers and models through a config file named `models.json`, located in the `.pi/agent/` folder inside your home directory (full path `~/.pi/agent/models.json`). Claude models frequently use `tool_use` / `tool_result` in Pi, so this guide uses EvoLink's **Anthropic Messages-compatible API** and configures it as a custom provider of type `anthropic-messages`.
`~` stands for your **home directory** (`/Users/your-username` on macOS, `/home/your-username` on Linux). `.pi` starts with a dot, making it a **hidden folder** that Finder / File Explorer won't show by default — so the easiest way to create the file below is via the command line. Just copy and paste.
This file does **not** exist by default (the `.pi` folder usually isn't created until Pi runs), so you need to create it manually. Follow these three steps:
* **macOS**: Press `Command + Space` to open Spotlight, type `Terminal`, and press Enter.
* **Windows**: Search for `PowerShell` in the Start menu and open it.
If you're new to the command line, see [FAQ - How do I open a command-line terminal?](#how-do-i-open-a-command-line-terminal) first.
Paste the following command into the terminal and press Enter. It automatically creates the needed folder and opens an empty `models.json` in a text editor:
```bash theme={null}
mkdir -p ~/.pi/agent && nano ~/.pi/agent/models.json
```
This drops you into the `nano` editor (a simple text editor inside the terminal).
```powershell theme={null}
mkdir -Force "$HOME\.pi\agent"; notepad "$HOME\.pi\agent\models.json"
```
Notepad will ask "Do you want to create a new file?" — click **Yes**.
Copy the **complete configuration** below and paste it into the editor you just opened:
```json theme={null}
{
"providers": {
"evolink": {
"name": "EvoLink Direct",
"baseUrl": "https://direct.evolink.ai",
"apiKey": "$EVOLINK_API_KEY",
"authHeader": true,
"api": "anthropic-messages",
"models": [
{ "id": "claude-fable-5", "reasoning": true, "contextWindow": 1000000, "maxTokens": 128000,
"cost": {"input": 9.0, "output": 45.0, "cacheRead": 0.9, "cacheWrite": 11.25} },
{ "id": "claude-sonnet-5", "reasoning": false, "contextWindow": 1000000, "maxTokens": 64000,
"cost": {"input": 2.7, "output": 13.5, "cacheRead": 0.27, "cacheWrite": 3.375} },
{ "id": "claude-haiku-4-5-20251001", "reasoning": false, "contextWindow": 200000, "maxTokens": 64000,
"cost": {"input": 0.9, "output": 4.5, "cacheRead": 0.09, "cacheWrite": 1.125} }
]
}
}
}
```
Then save:
* **nano (macOS / Linux)**: Press `Control + O` then Enter to save, then `Control + X` to exit.
* **Notepad (Windows)**: Press `Control + S` to save, then close the window.
**Key field descriptions (don't skip any):**
* **`api: "anthropic-messages"`** — uses EvoLink's Anthropic Messages-compatible route, so Pi uses Claude's native `tool_use` / `tool_result` protocol.
* **Set `baseUrl` only to the domain root** `https://direct.evolink.ai` — do **not** manually add `/v1` or `/v1/messages`. Pi appends `/v1/messages` automatically; adding it manually duplicates the path and causes a `404 Invalid URL`.
* **`authHeader: true` is required.** Pi's Anthropic SDK uses `x-api-key` by default, while EvoLink's `/v1/messages` expects `Authorization: Bearer `. This field makes Pi send the correct Bearer authentication header.
* **`apiKey` has two forms — pick one:**
* **Option 1 · Paste the key directly (simplest, good for local personal use)**: replace `"$EVOLINK_API_KEY"` in the config with your real key, e.g. `"apiKey": "sk-your-real-key"`. Done in one step, no environment variable needed; the downside is the key sits in **plaintext** in the config file, so don't share this file or commit it to Git.
* **Option 2 · Environment variable interpolation (more secure, recommended)**: keep `"$EVOLINK_API_KEY"` as is and put the real key in an environment variable (see "Set the API Key Environment Variable" below). This keeps the plaintext key out of the config file.
* **(Advanced)** Pi's `apiKey` also supports `${EVOLINK_API_KEY}` (equivalent; use braces to disambiguate when the variable name is immediately followed by literal text) and `!command` (a leading `!` runs a command and uses its output as the key, for example reading from a password manager: `"!op read 'op://vault/item/credential'"`). If you need a literal `$` or `!` in the value, escape them as `$$` and `$!`.
Don't want to touch the key in the config file? You can also use `/login` in interactive mode to select this provider and store the key in `~/.pi/agent/auth.json` — the effect is equivalent.
### Set the API Key Environment Variable
You only need this step if you chose **Option 2 (environment variable interpolation)** above. If you chose **Option 1 (paste the key directly)**, the key is already in the config file — skip this section and go straight to Step 2.
Point the `$EVOLINK_API_KEY` referenced in the configuration above to your real key. Below are both the **temporary** version (only valid in the current terminal window; gone once you close it — good for a first test run) and the **persistent** version (loaded automatically every time you open a terminal):
**Temporary** (current terminal window; lost when closed):
```bash theme={null}
export EVOLINK_API_KEY=your_EvoLink_API_Key
```
**Persistent** (written to your shell config file; applied automatically in every new terminal):
```bash theme={null}
# If you use zsh (the default on modern macOS)
echo 'export EVOLINK_API_KEY=your_EvoLink_API_Key' >> ~/.zshrc
source ~/.zshrc
# If you use bash
echo 'export EVOLINK_API_KEY=your_EvoLink_API_Key' >> ~/.bashrc
source ~/.bashrc
```
Not sure which shell you're using? Run `echo $SHELL` in the terminal — if the output contains `zsh`, use `~/.zshrc`; if it contains `bash`, use `~/.bashrc`.
**Temporary** (current PowerShell window; lost when closed):
```powershell theme={null}
$env:EVOLINK_API_KEY = "your_EvoLink_API_Key"
```
**Persistent** (written to user environment variables; applied in all new windows):
```powershell theme={null}
setx EVOLINK_API_KEY "your_EvoLink_API_Key"
```
`setx` **does not affect the current window**; **restart your terminal** (close and reopen PowerShell) for it to take effect.
## Step 2: Start Using and Verify
### 1. Select a Model
Run the following command in your terminal to launch Pi:
```bash theme={null}
pi
```
Inside the Pi session, enter `/model` to open the model selector, then choose the EvoLink model configured above (such as `claude-fable-5`).
### 2. Verify the Configuration
After selecting a model, first enter a simple prompt to verify the model response:
```
who are you
```
 Then enter a task that triggers a tool call to verify the agent capabilities:
```
List the files in the current directory and tell me which ones are Markdown files.
```
**What success looks like:**
* You see the AI's normal reply (a few lines of text).
* Pi can call the `ls` tool in the second task and continue responding.
* There are **no** errors such as `401`, `404`, `model_not_found`, or `Unexpected role "tool"`.
## Troubleshooting
The following is organized by **the actual error you see** — just find the one that matches.
### Returns `401` (Invalid API key)
```
{"code":"unauthorized","message":"Invalid API key (request id: ...)"}
```
Possible causes:
* The environment variable didn't take effect (most common): run `test -n "$EVOLINK_API_KEY" && echo "Key loaded" || echo "Key not loaded"` in the current terminal; on Windows, you need to **restart the terminal** after using `setx`.
* The `apiKey` field is wrong: confirm that `models.json` contains `"$EVOLINK_API_KEY"` (referencing the environment variable), rather than treating the variable name as a literal key.
* `"authHeader": true` is missing: EvoLink's `/v1/messages` requires a Bearer token, so confirm this field is inside the same provider configuration as `apiKey`.
* The key itself is invalid or has been disabled: check it in the [EvoLink console](https://evolink.ai/dashboard).
### Returns `404 Invalid URL`
```
{"message":"Invalid URL (POST /v1/v1/messages)","type":"invalid_request_error"}
```
Cause: you **manually added an extra path** in `baseUrl`. Pi automatically appends `/v1/messages`, so change `baseUrl` back to the domain root: `https://direct.evolink.ai`.
### Returns `404 model_not_found`
```
{"code":"model_not_found","message":"Model '...' is not available for this API key ... Call GET /v1/models ..."}
```
Cause: the model ID is misspelled or the model is not enabled. Check that the `id` in `models.json` exactly matches the model name returned by the EvoLink console / `/v1/models`.
### Returns `400 Unexpected role "tool"`
```text theme={null}
400: messages: Unexpected role "tool". Allowed roles are "user" or "assistant".
```
**Cause**: the configuration is still using `api: "openai-completions"` with a Base URL ending in `/v1`. Pi sends agent tool results with OpenAI's `role: "tool"`, which the current Claude-compatible route does not accept.
**Solution**: change these three provider fields:
```json theme={null}
{
"baseUrl": "https://direct.evolink.ai",
"authHeader": true,
"api": "anthropic-messages"
}
```
This issue cannot be fixed with `supportsDeveloperRole` or `supportsReasoningEffort`, because the rejected role is the tool role, not the `developer` role or a reasoning parameter. Start a new session after updating the configuration.
## About Cost
The `cost` field in the `models.json` above is EvoLink's actual price (a flat 10% discount, in USD per million tokens), for Pi to use as a reference when estimating usage:
| Model | Input | Output | Cache Read | Cache Write |
| --------------------------- | ------ | ------- | ---------- | ----------- |
| `claude-fable-5` | \$9.00 | \$45.00 | \$0.90 | \$11.25 |
| `claude-sonnet-5` | \$2.70 | \$13.50 | \$0.27 | \$3.375 |
| `claude-haiku-4-5-20251001` | \$0.90 | \$4.50 | \$0.09 | \$1.125 |
Cache Read is the price when the cache is hit (about 0.1× of Input). Actual savings depend on the cache hit rate; the larger the context, the less stable the hits, so the benefit is discounted — don't treat it as an unconditional low price.
## FAQ
### How do I open a command-line terminal?
* Option 1: Press `Command + Space` to open Spotlight, type `Terminal`, and press Enter.
* Option 2: Go to Applications → Utilities → Terminal.
* Option 1: Press `Win + R`, type `powershell`, and press Enter.
* Option 2: Search for "PowerShell" in the Start menu.
* Press `Ctrl + Alt + T`, or search for "Terminal" in your application menu.
### 1. Why set `baseUrl` only to the domain root?
Because Pi's `anthropic-messages` provider automatically appends `/v1/messages` after `baseUrl`. Adding `/v1` or `/v1/messages` manually duplicates the path and returns `404 Invalid URL`. Use only `https://direct.evolink.ai`.
### 2. Do I need to set `authHeader: true`?
Yes. Pi's Anthropic SDK uses `x-api-key` by default, while EvoLink's `/v1/messages` uses a Bearer token. `authHeader: true` makes Pi send `Authorization: Bearer `; omitting it may cause a `401`.
### 3. Why does this guide follow the terminal CLI?
Pi's official primary form is the **terminal CLI** (four run modes: interactive / print / RPC / SDK). Configuring and verifying the EvoLink integration is all done in the CLI, which is stable and reliable. All steps in this guide follow the CLI.
### 4. How do I avoid writing the API Key in plaintext in the config?
Use environment variable interpolation in the `apiKey` field (such as `"$EVOLINK_API_KEY"`), keeping the real key in an environment variable.
### 5. Which common models does EvoLink support?
EvoLink supports the full Claude family (it also supports GPT, Gemini, and more, which you can view in the console). For planning / complex reasoning, `claude-fable-5` is recommended; for everyday execution, use `claude-sonnet-5`; for lightweight tasks, use `claude-haiku-4-5-20251001`.
### 6. How do I check usage?
Log in to the [EvoLink console](https://evolink.ai/dashboard) to view request volume, consumption, and token usage.
For more usage and configuration, refer to the [Pi official repository](https://github.com/earendil-works/pi).
Then enter a task that triggers a tool call to verify the agent capabilities:
```
List the files in the current directory and tell me which ones are Markdown files.
```
**What success looks like:**
* You see the AI's normal reply (a few lines of text).
* Pi can call the `ls` tool in the second task and continue responding.
* There are **no** errors such as `401`, `404`, `model_not_found`, or `Unexpected role "tool"`.
## Troubleshooting
The following is organized by **the actual error you see** — just find the one that matches.
### Returns `401` (Invalid API key)
```
{"code":"unauthorized","message":"Invalid API key (request id: ...)"}
```
Possible causes:
* The environment variable didn't take effect (most common): run `test -n "$EVOLINK_API_KEY" && echo "Key loaded" || echo "Key not loaded"` in the current terminal; on Windows, you need to **restart the terminal** after using `setx`.
* The `apiKey` field is wrong: confirm that `models.json` contains `"$EVOLINK_API_KEY"` (referencing the environment variable), rather than treating the variable name as a literal key.
* `"authHeader": true` is missing: EvoLink's `/v1/messages` requires a Bearer token, so confirm this field is inside the same provider configuration as `apiKey`.
* The key itself is invalid or has been disabled: check it in the [EvoLink console](https://evolink.ai/dashboard).
### Returns `404 Invalid URL`
```
{"message":"Invalid URL (POST /v1/v1/messages)","type":"invalid_request_error"}
```
Cause: you **manually added an extra path** in `baseUrl`. Pi automatically appends `/v1/messages`, so change `baseUrl` back to the domain root: `https://direct.evolink.ai`.
### Returns `404 model_not_found`
```
{"code":"model_not_found","message":"Model '...' is not available for this API key ... Call GET /v1/models ..."}
```
Cause: the model ID is misspelled or the model is not enabled. Check that the `id` in `models.json` exactly matches the model name returned by the EvoLink console / `/v1/models`.
### Returns `400 Unexpected role "tool"`
```text theme={null}
400: messages: Unexpected role "tool". Allowed roles are "user" or "assistant".
```
**Cause**: the configuration is still using `api: "openai-completions"` with a Base URL ending in `/v1`. Pi sends agent tool results with OpenAI's `role: "tool"`, which the current Claude-compatible route does not accept.
**Solution**: change these three provider fields:
```json theme={null}
{
"baseUrl": "https://direct.evolink.ai",
"authHeader": true,
"api": "anthropic-messages"
}
```
This issue cannot be fixed with `supportsDeveloperRole` or `supportsReasoningEffort`, because the rejected role is the tool role, not the `developer` role or a reasoning parameter. Start a new session after updating the configuration.
## About Cost
The `cost` field in the `models.json` above is EvoLink's actual price (a flat 10% discount, in USD per million tokens), for Pi to use as a reference when estimating usage:
| Model | Input | Output | Cache Read | Cache Write |
| --------------------------- | ------ | ------- | ---------- | ----------- |
| `claude-fable-5` | \$9.00 | \$45.00 | \$0.90 | \$11.25 |
| `claude-sonnet-5` | \$2.70 | \$13.50 | \$0.27 | \$3.375 |
| `claude-haiku-4-5-20251001` | \$0.90 | \$4.50 | \$0.09 | \$1.125 |
Cache Read is the price when the cache is hit (about 0.1× of Input). Actual savings depend on the cache hit rate; the larger the context, the less stable the hits, so the benefit is discounted — don't treat it as an unconditional low price.
## FAQ
### How do I open a command-line terminal?
* Option 1: Press `Command + Space` to open Spotlight, type `Terminal`, and press Enter.
* Option 2: Go to Applications → Utilities → Terminal.
* Option 1: Press `Win + R`, type `powershell`, and press Enter.
* Option 2: Search for "PowerShell" in the Start menu.
* Press `Ctrl + Alt + T`, or search for "Terminal" in your application menu.
### 1. Why set `baseUrl` only to the domain root?
Because Pi's `anthropic-messages` provider automatically appends `/v1/messages` after `baseUrl`. Adding `/v1` or `/v1/messages` manually duplicates the path and returns `404 Invalid URL`. Use only `https://direct.evolink.ai`.
### 2. Do I need to set `authHeader: true`?
Yes. Pi's Anthropic SDK uses `x-api-key` by default, while EvoLink's `/v1/messages` uses a Bearer token. `authHeader: true` makes Pi send `Authorization: Bearer `; omitting it may cause a `401`.
### 3. Why does this guide follow the terminal CLI?
Pi's official primary form is the **terminal CLI** (four run modes: interactive / print / RPC / SDK). Configuring and verifying the EvoLink integration is all done in the CLI, which is stable and reliable. All steps in this guide follow the CLI.
### 4. How do I avoid writing the API Key in plaintext in the config?
Use environment variable interpolation in the `apiKey` field (such as `"$EVOLINK_API_KEY"`), keeping the real key in an environment variable.
### 5. Which common models does EvoLink support?
EvoLink supports the full Claude family (it also supports GPT, Gemini, and more, which you can view in the console). For planning / complex reasoning, `claude-fable-5` is recommended; for everyday execution, use `claude-sonnet-5`; for lightweight tasks, use `claude-haiku-4-5-20251001`.
### 6. How do I check usage?
Log in to the [EvoLink console](https://evolink.ai/dashboard) to view request volume, consumption, and token usage.
For more usage and configuration, refer to the [Pi official repository](https://github.com/earendil-works/pi).