> ## Documentation Index
> Fetch the complete documentation index at: https://evolink.ai/docs/llms.txt
> Use this file to discover all available pages before exploring further.
# Hermes Agent
> Connect Hermes Agent to EvoLink.AI
## Overview
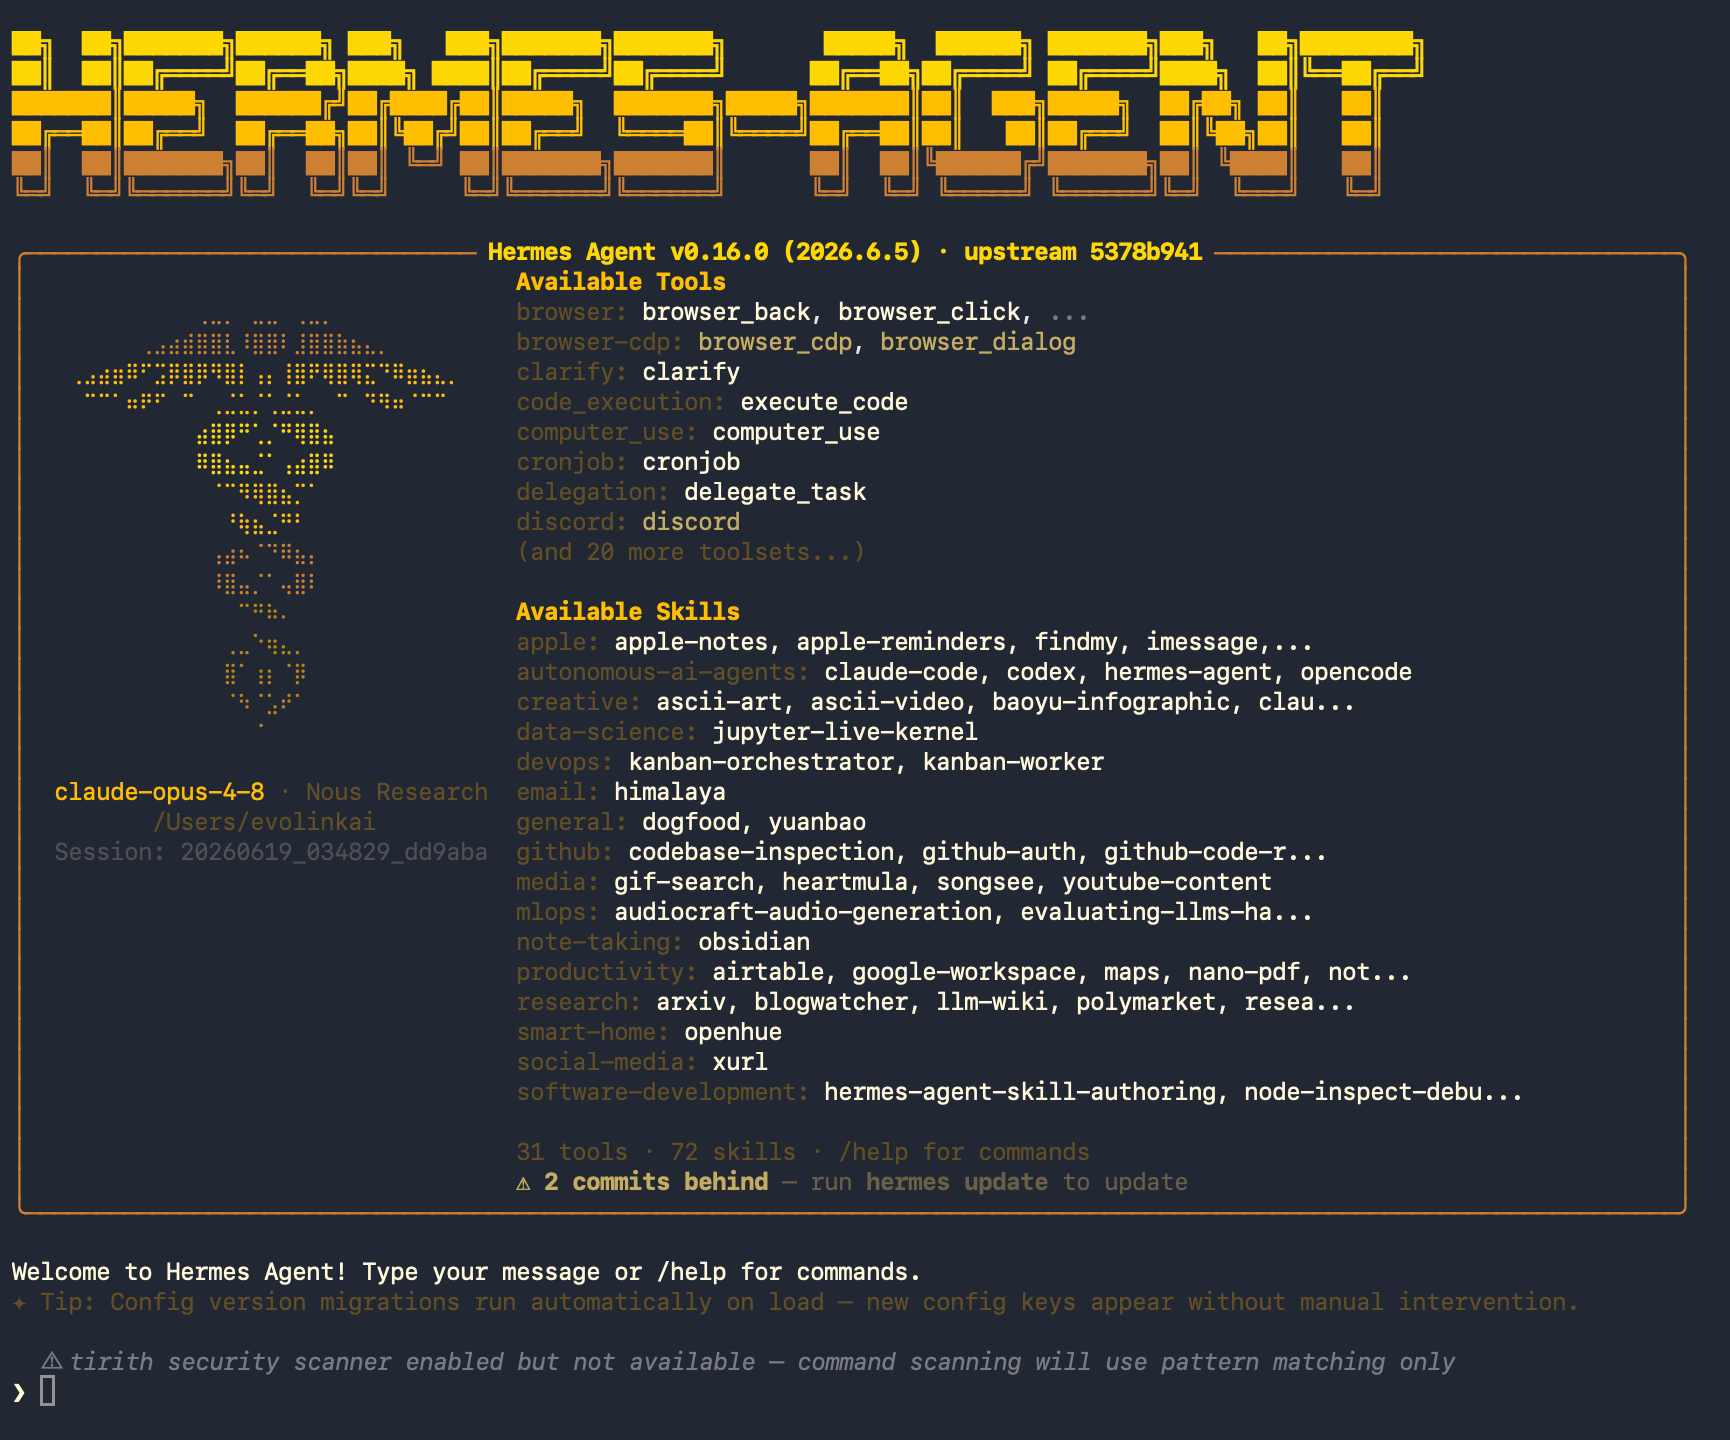 Hermes Agent is an open-source, terminal-native autonomous AI agent (a command-line tool) from [Nous Research](https://nousresearch.com). It features persistent memory, self-created skills, and a messaging gateway supporting 21+ platforms (Telegram, Discord, Slack, WhatsApp, Signal, Matrix, and more). It can run across a variety of backend environments including local, Docker, SSH, and Modal.
Hermes Agent supports a wide range of large model providers and also supports **custom OpenAI-compatible endpoints**. By configuring and integrating Hermes Agent with the **EvoLink API**, you can use EvoLink's Claude, GPT, Gemini, and other model families directly from your terminal, enabling multi-model access through a single unified key.
**Note the distinction:** Hermes **Agent** is an open-source command-line application (MIT licensed). It is not the same as Nous Research's Hermes 3 / Hermes 4 **models**. This guide covers the Hermes Agent tool.
## Before You Begin
Before starting the configuration, make sure you have completed the following preparations:
### 1. System and Model Requirements
* **Terminal environment**: Hermes Agent runs in the command line on macOS, Linux, and Windows (native or WSL2).
* **Model context requirement**: Hermes Agent recommends using a **model with a context length of at least 64K (64,000) tokens**. Because the system prompt and tool definitions themselves consume a significant amount of context, a window that is too small may fill up and leave no room for conversation, causing it to be rejected at startup. If you encounter context-related errors, simply switch to a model with a larger context (EvoLink's Claude / Gemini families all meet this requirement).
### 2. Get an EvoLink API Key
* Log in to the [EvoLink console](https://evolink.ai/dashboard)
* Find API Keys in the console, click the "Create New Key" button, then copy the generated key
* The API Key usually starts with `sk-`. Please keep it safe.
## Step 1: Install Hermes Agent
**Tip:** If you don't know how to open a command-line terminal, see [FAQ - How to open a command-line terminal](#11-how-to-open-a-command-line-terminal)
Run the one-line install script in your terminal:
```bash theme={null}
curl -fsSL https://hermes-agent.nousresearch.com/install.sh | bash
```
Hermes Agent is an open-source, terminal-native autonomous AI agent (a command-line tool) from [Nous Research](https://nousresearch.com). It features persistent memory, self-created skills, and a messaging gateway supporting 21+ platforms (Telegram, Discord, Slack, WhatsApp, Signal, Matrix, and more). It can run across a variety of backend environments including local, Docker, SSH, and Modal.
Hermes Agent supports a wide range of large model providers and also supports **custom OpenAI-compatible endpoints**. By configuring and integrating Hermes Agent with the **EvoLink API**, you can use EvoLink's Claude, GPT, Gemini, and other model families directly from your terminal, enabling multi-model access through a single unified key.
**Note the distinction:** Hermes **Agent** is an open-source command-line application (MIT licensed). It is not the same as Nous Research's Hermes 3 / Hermes 4 **models**. This guide covers the Hermes Agent tool.
## Before You Begin
Before starting the configuration, make sure you have completed the following preparations:
### 1. System and Model Requirements
* **Terminal environment**: Hermes Agent runs in the command line on macOS, Linux, and Windows (native or WSL2).
* **Model context requirement**: Hermes Agent recommends using a **model with a context length of at least 64K (64,000) tokens**. Because the system prompt and tool definitions themselves consume a significant amount of context, a window that is too small may fill up and leave no room for conversation, causing it to be rejected at startup. If you encounter context-related errors, simply switch to a model with a larger context (EvoLink's Claude / Gemini families all meet this requirement).
### 2. Get an EvoLink API Key
* Log in to the [EvoLink console](https://evolink.ai/dashboard)
* Find API Keys in the console, click the "Create New Key" button, then copy the generated key
* The API Key usually starts with `sk-`. Please keep it safe.
## Step 1: Install Hermes Agent
**Tip:** If you don't know how to open a command-line terminal, see [FAQ - How to open a command-line terminal](#11-how-to-open-a-command-line-terminal)
Run the one-line install script in your terminal:
```bash theme={null}
curl -fsSL https://hermes-agent.nousresearch.com/install.sh | bash
```
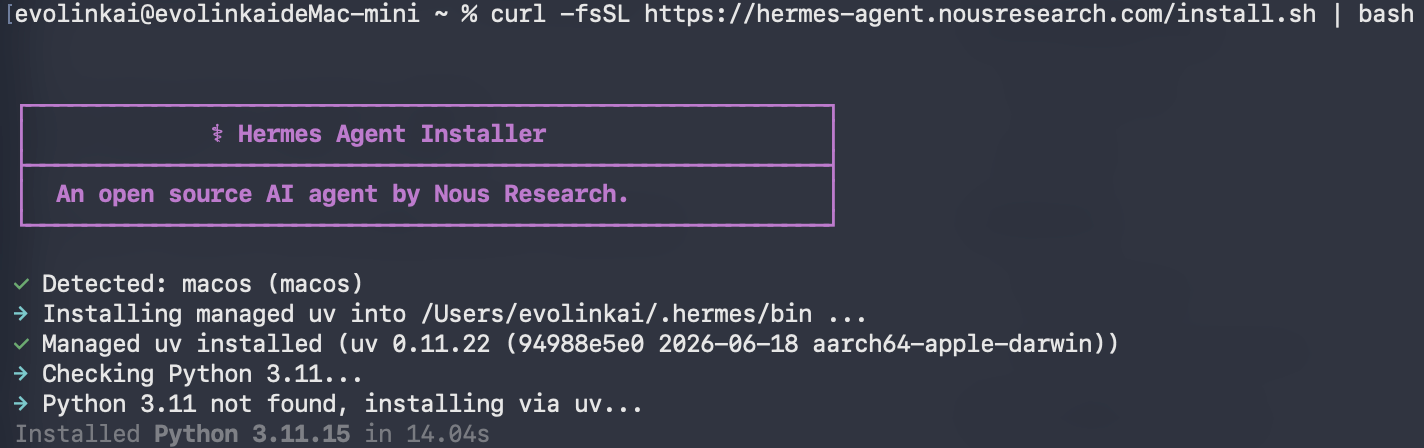 Once installation is complete, reload your terminal configuration to make the command take effect:
```bash theme={null}
source ~/.zshrc # or source ~/.bashrc
```
**First run: choose an installation method (Quick or Full)**
Running `hermes` for the first time launches an interactive install wizard, which first asks how you would like to set up Hermes:
Once installation is complete, reload your terminal configuration to make the command take effect:
```bash theme={null}
source ~/.zshrc # or source ~/.bashrc
```
**First run: choose an installation method (Quick or Full)**
Running `hermes` for the first time launches an interactive install wizard, which first asks how you would like to set up Hermes:
 * **Quick Setup (Nous Portal)** — Sign in via the free Nous OAuth, **no API Key required**, with models and tools configured automatically for the fastest start. However, it uses Nous Portal's models by default, **not EvoLink**. To connect EvoLink, you'll need to run `hermes model` separately after installation (see [Step 2](#step-2-configure-the-evolink-api-quick-users-or-reconfiguration)).
* **Full setup** — You configure each provider, tool, and option yourself (using your own key). **This is the recommended option for users who want to connect EvoLink directly**, as you can enter EvoLink's endpoint URL and key in one go during installation.
Below we demonstrate a few key steps for choosing **Full setup** to connect EvoLink:
Use the arrow keys to select **Full setup — configure every provider, tool & option yourself (bring your own keys)**, then press Enter to confirm.
In the provider list, scroll down and select **custom endpoint (enter URL manually)**. Because EvoLink provides an **OpenAI-compatible endpoint**, you connect via the "custom endpoint" option here.
* **Quick Setup (Nous Portal)** — Sign in via the free Nous OAuth, **no API Key required**, with models and tools configured automatically for the fastest start. However, it uses Nous Portal's models by default, **not EvoLink**. To connect EvoLink, you'll need to run `hermes model` separately after installation (see [Step 2](#step-2-configure-the-evolink-api-quick-users-or-reconfiguration)).
* **Full setup** — You configure each provider, tool, and option yourself (using your own key). **This is the recommended option for users who want to connect EvoLink directly**, as you can enter EvoLink's endpoint URL and key in one go during installation.
Below we demonstrate a few key steps for choosing **Full setup** to connect EvoLink:
Use the arrow keys to select **Full setup — configure every provider, tool & option yourself (bring your own keys)**, then press Enter to confirm.
In the provider list, scroll down and select **custom endpoint (enter URL manually)**. Because EvoLink provides an **OpenAI-compatible endpoint**, you connect via the "custom endpoint" option here.
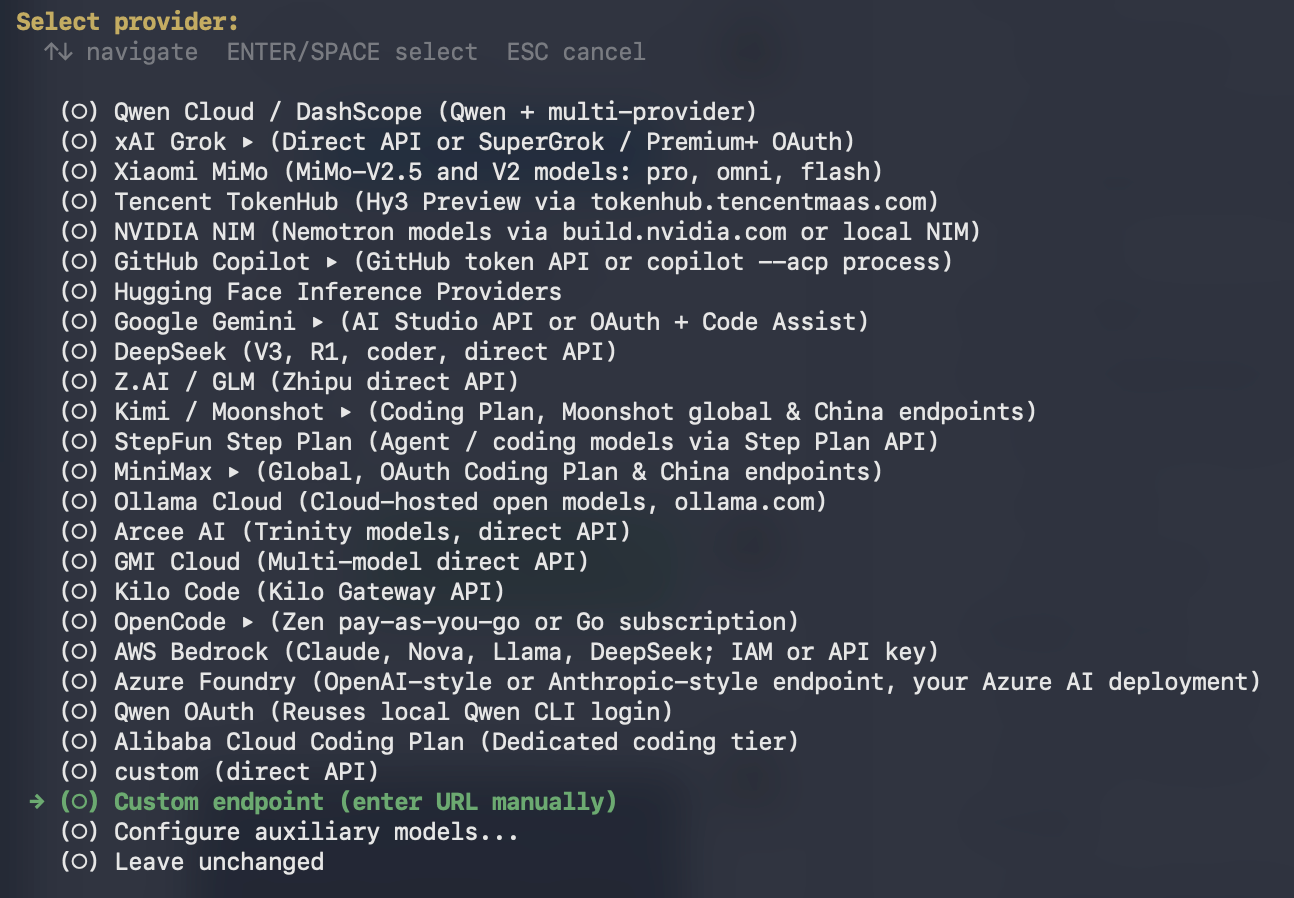 The wizard will prompt you for the endpoint details in turn:
* **API base URL**: enter `https://direct.evolink.ai/v1`
* **API key**: enter your EvoLink API Key (starting with `sk-`)
After you enter them, the wizard automatically validates the endpoint. If you see a message like `Verified endpoint via https://direct.evolink.ai/v1/models (154 model(s) visible)`, the endpoint is connected and the key is valid. Then follow the prompts to continue selecting a default model and tools.
The wizard will prompt you for the endpoint details in turn:
* **API base URL**: enter `https://direct.evolink.ai/v1`
* **API key**: enter your EvoLink API Key (starting with `sk-`)
After you enter them, the wizard automatically validates the endpoint. If you see a message like `Verified endpoint via https://direct.evolink.ai/v1/models (154 model(s) visible)`, the endpoint is connected and the key is valid. Then follow the prompts to continue selecting a default model and tools.
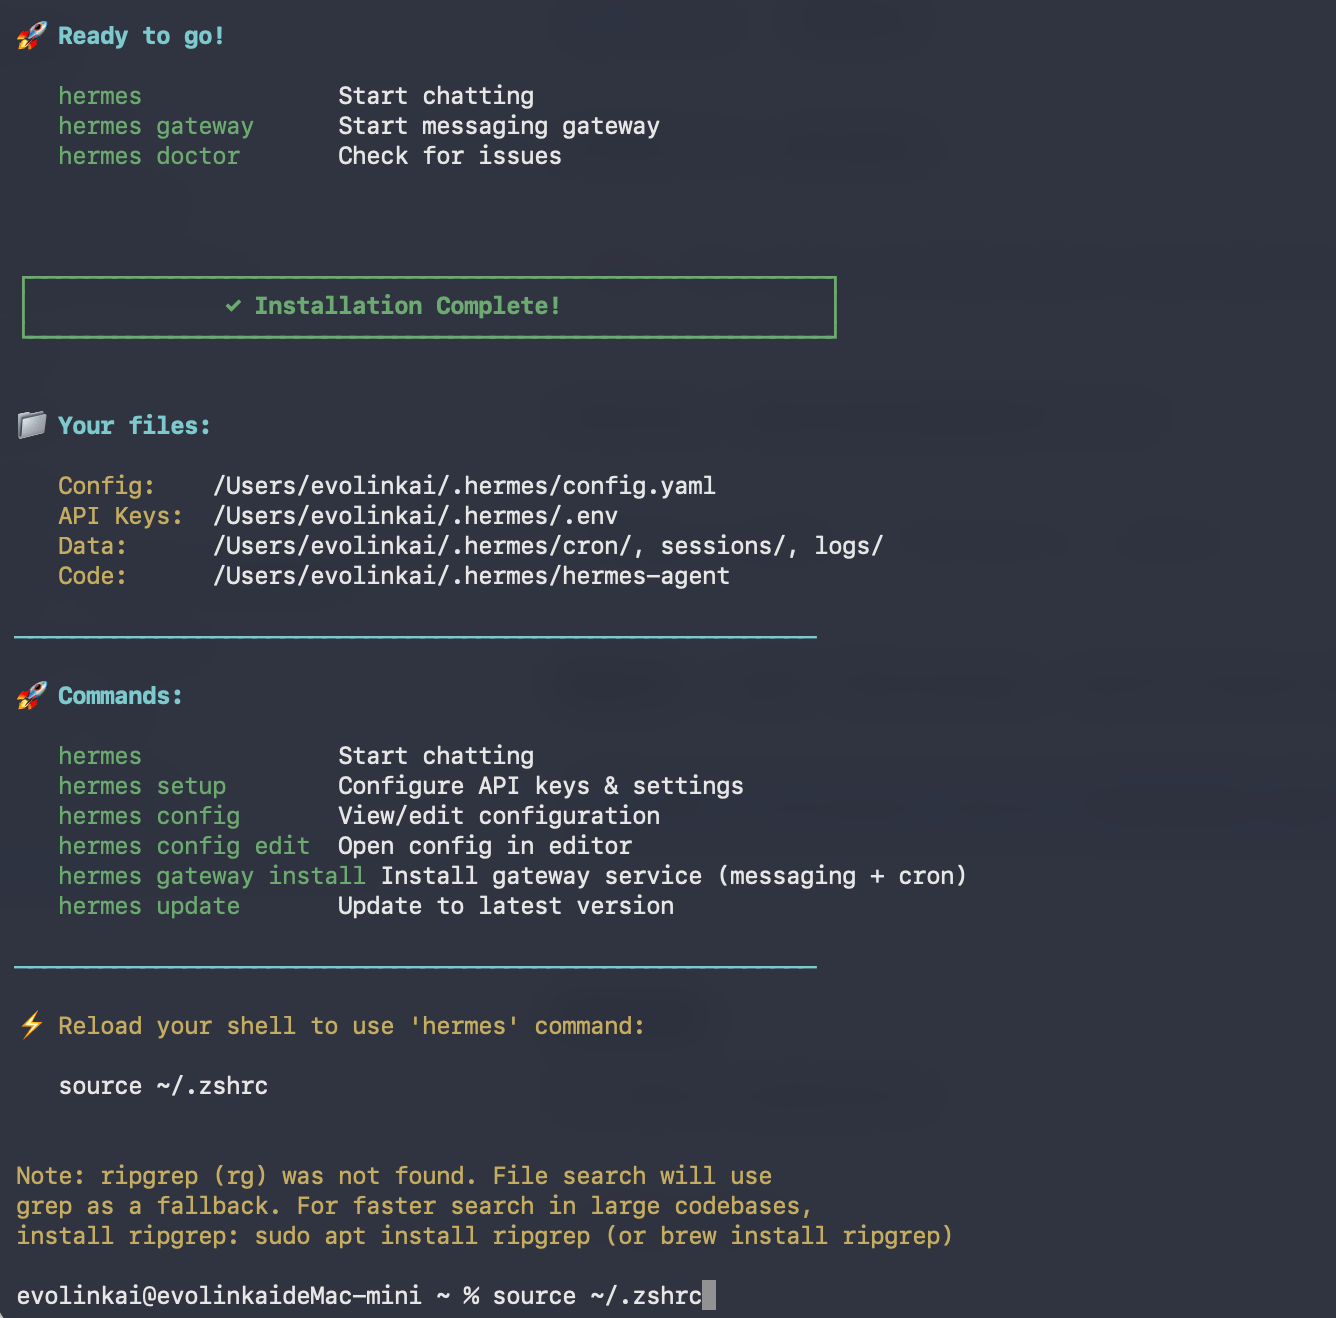
 **Expected result:** After completing the wizard, an **Installation Complete** page is displayed, listing the configuration file locations and common commands.
 WSL2 and Android (Termux) environments also use the `install.sh` script above to install.
Open PowerShell **as an administrator** (the title bar will show "Administrator: Windows PowerShell"), then run the one-line install command:
```powershell theme={null}
iex (irm https://hermes-agent.nousresearch.com/install.ps1)
```
WSL2 and Android (Termux) environments also use the `install.sh` script above to install.
Open PowerShell **as an administrator** (the title bar will show "Administrator: Windows PowerShell"), then run the one-line install command:
```powershell theme={null}
iex (irm https://hermes-agent.nousresearch.com/install.ps1)
```
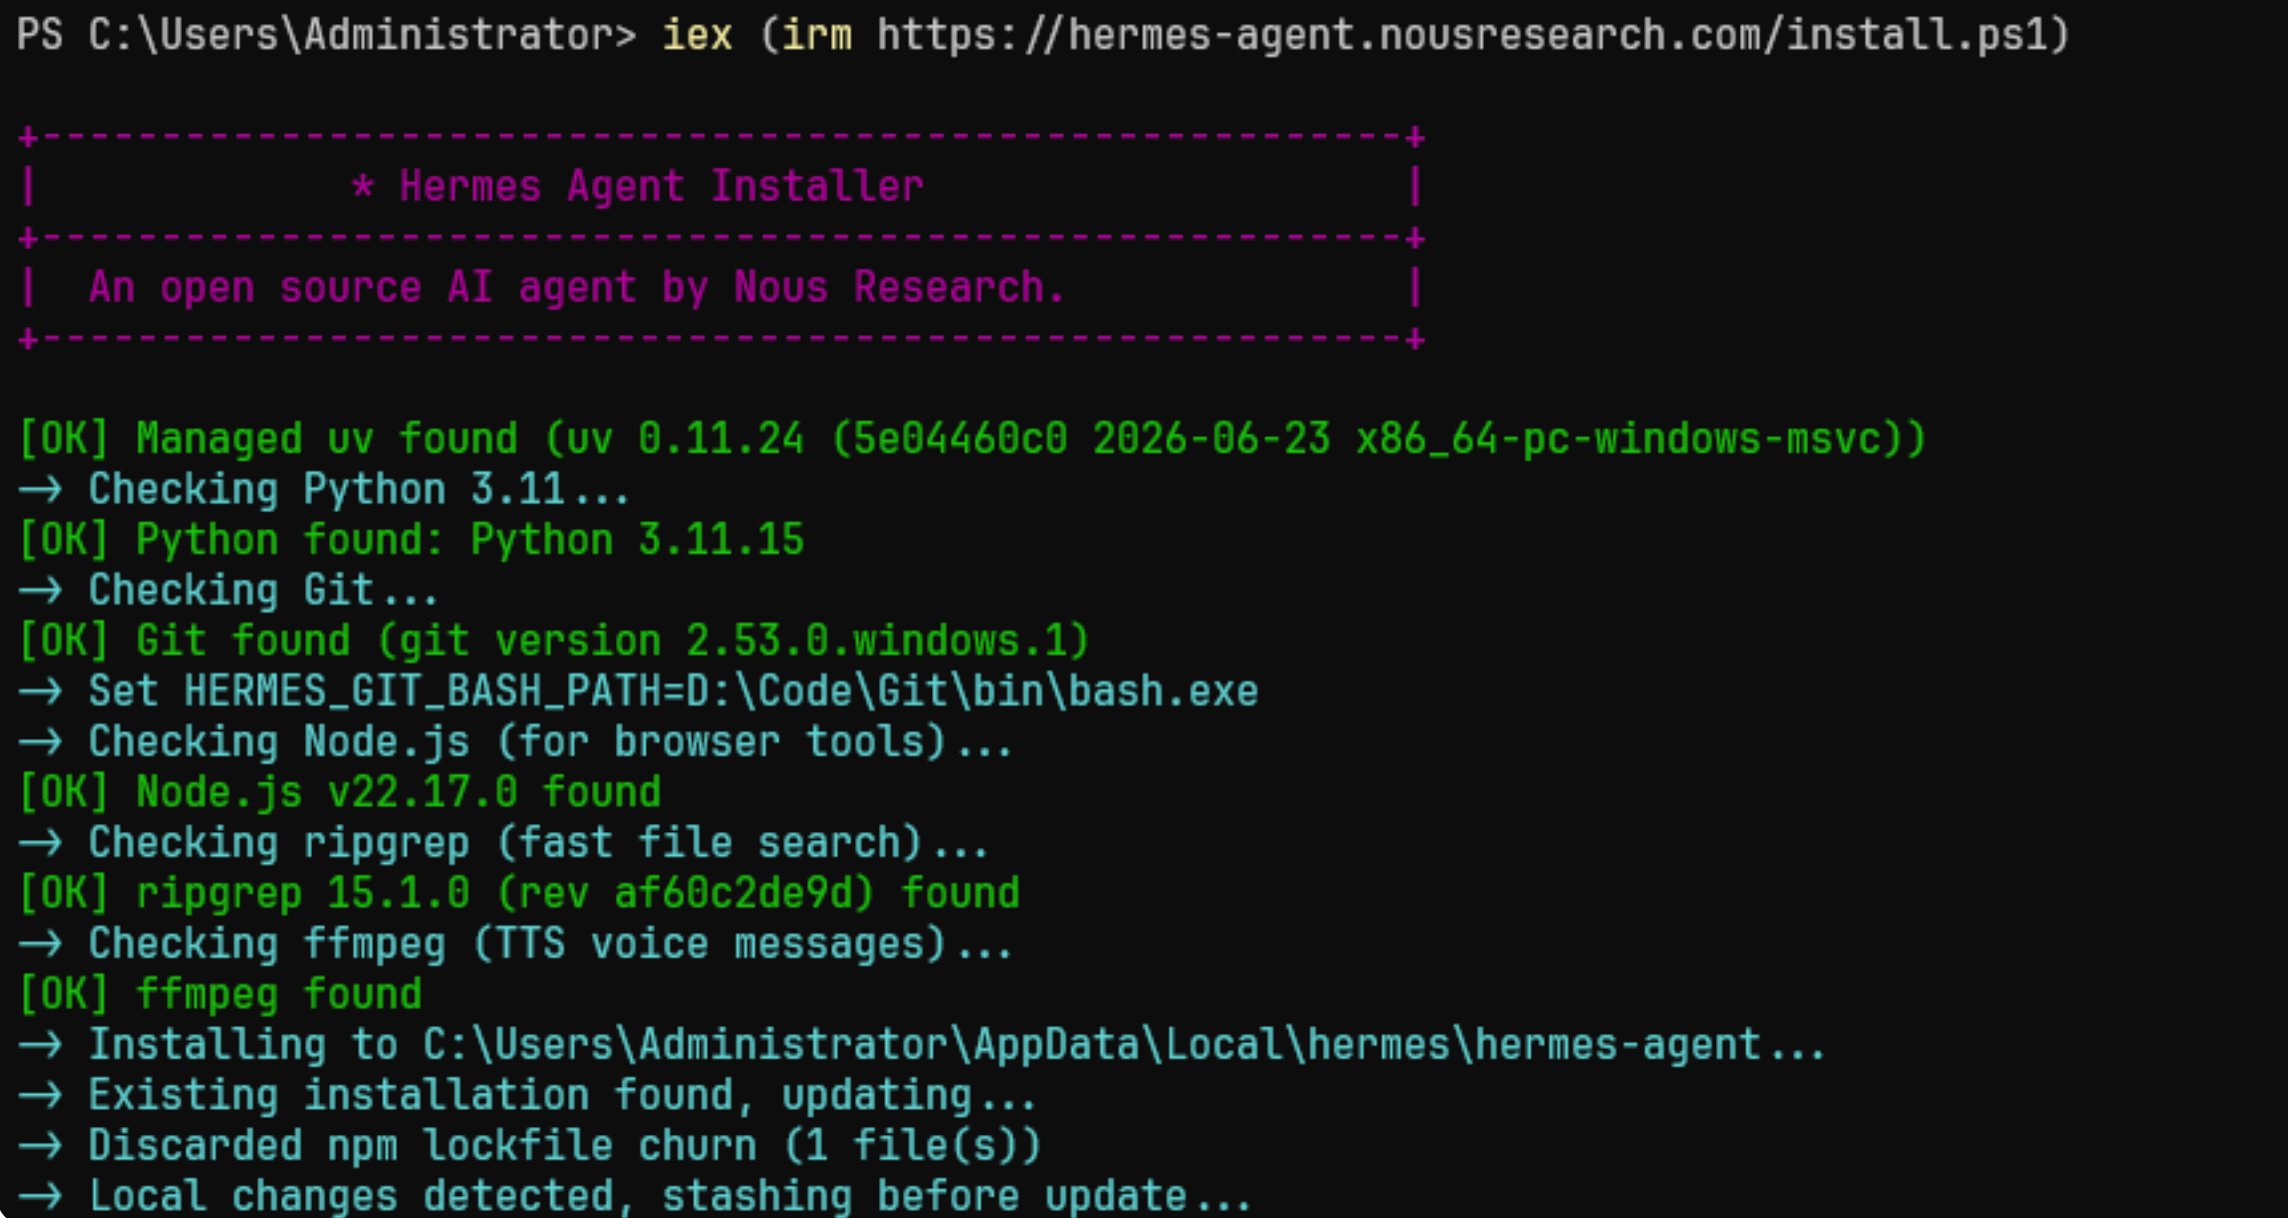 The script automatically checks for and prepares dependencies such as uv, Python, Git, Node.js, ripgrep, and ffmpeg, and installs Hermes Agent into the `C:\Users\\AppData\Local\hermes\` directory.
**If it errors:** If you get an execution policy restriction, make sure PowerShell is opened as an administrator, or run `Set-ExecutionPolicy -Scope CurrentUser RemoteSigned` first and then retry.
Once installation is complete, **restart your terminal** as prompted (close and reopen PowerShell) so that the PATH change for the `hermes` command takes effect.
**First run: choose an installation method (Quick / Full / Blank Slate)**
Running `hermes` for the first time launches an interactive install wizard, which first asks how you would like to set up Hermes. On Windows you make a selection by **typing the number + Enter**:
The script automatically checks for and prepares dependencies such as uv, Python, Git, Node.js, ripgrep, and ffmpeg, and installs Hermes Agent into the `C:\Users\\AppData\Local\hermes\` directory.
**If it errors:** If you get an execution policy restriction, make sure PowerShell is opened as an administrator, or run `Set-ExecutionPolicy -Scope CurrentUser RemoteSigned` first and then retry.
Once installation is complete, **restart your terminal** as prompted (close and reopen PowerShell) so that the PATH change for the `hermes` command takes effect.
**First run: choose an installation method (Quick / Full / Blank Slate)**
Running `hermes` for the first time launches an interactive install wizard, which first asks how you would like to set up Hermes. On Windows you make a selection by **typing the number + Enter**:
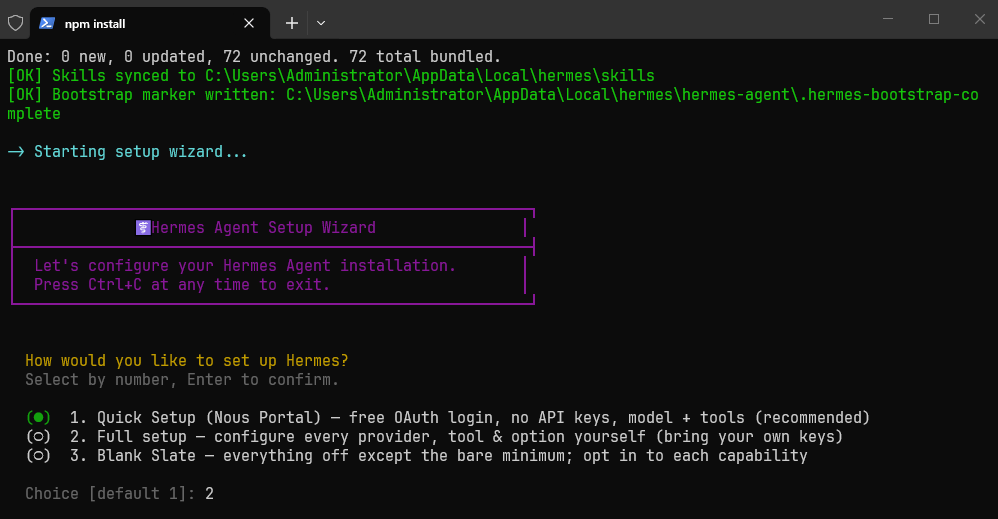 * **Quick Setup (Nous Portal)** — Sign in via the free Nous OAuth, **no API Key required**, with models and tools configured automatically for the fastest start. However, it uses Nous Portal's models by default, **not EvoLink**. To connect EvoLink, you'll need to run `hermes model` separately after installation (see [Step 2](#step-2-configure-the-evolink-api-quick-users-or-reconfiguration)).
* **Full setup** — You configure each provider, tool, and option yourself (using your own key). **This is the recommended option for users who want to connect EvoLink directly**, as you can enter EvoLink's endpoint URL and key in one go during installation.
* **Blank Slate** — Keeps only the minimum functionality, with everything else enabled individually as needed. Suitable for advanced users.
Below we demonstrate the key steps for typing `2` to choose **Full setup** and connect EvoLink:
At the `How would you like to set up Hermes?` prompt, type `2` (i.e. **Full setup — configure every provider, tool & option yourself**) and press Enter to confirm.
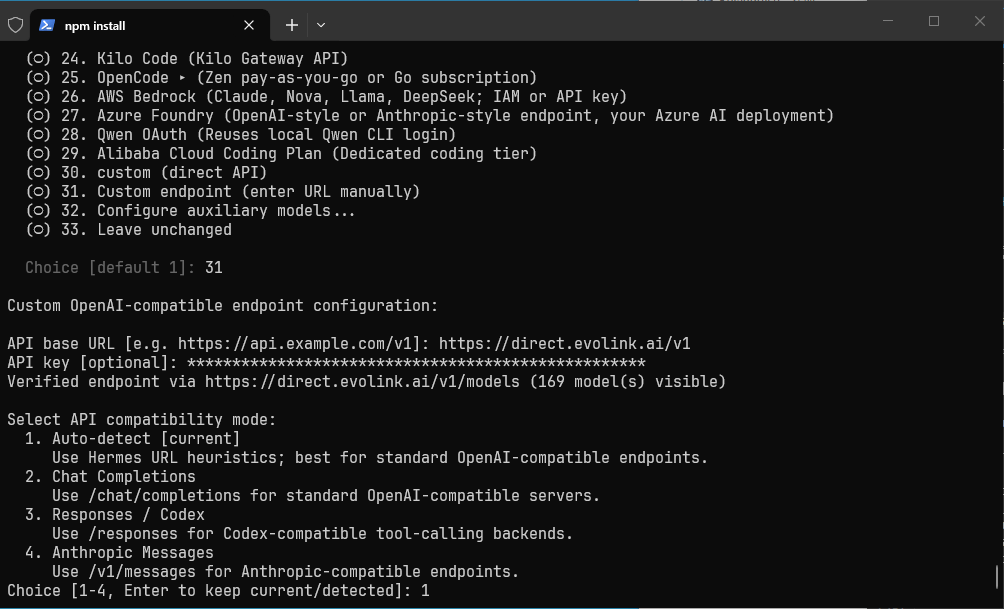
In the provider list, scroll down to find **custom endpoint (enter URL manually)**, type its corresponding number (such as `31` in the example) and press Enter. Because EvoLink provides an **OpenAI-compatible endpoint**, you connect via the "custom endpoint" option here.
The wizard will prompt you for the endpoint details in turn:
* **API base URL**: enter `https://direct.evolink.ai/v1`
* **API key**: enter your EvoLink API Key (starting with `sk-`, masked with `*` as you type)
* **API compatibility mode**: select **Chat Completions** or keep **Auto-detect \[current]** (just press Enter)
After you enter them, the wizard automatically validates the endpoint. If you see a message like `Verified endpoint via https://direct.evolink.ai/v1/models (169 model(s) visible)`, the endpoint is connected and the key is valid.
* **Quick Setup (Nous Portal)** — Sign in via the free Nous OAuth, **no API Key required**, with models and tools configured automatically for the fastest start. However, it uses Nous Portal's models by default, **not EvoLink**. To connect EvoLink, you'll need to run `hermes model` separately after installation (see [Step 2](#step-2-configure-the-evolink-api-quick-users-or-reconfiguration)).
* **Full setup** — You configure each provider, tool, and option yourself (using your own key). **This is the recommended option for users who want to connect EvoLink directly**, as you can enter EvoLink's endpoint URL and key in one go during installation.
* **Blank Slate** — Keeps only the minimum functionality, with everything else enabled individually as needed. Suitable for advanced users.
Below we demonstrate the key steps for typing `2` to choose **Full setup** and connect EvoLink:
At the `How would you like to set up Hermes?` prompt, type `2` (i.e. **Full setup — configure every provider, tool & option yourself**) and press Enter to confirm.
In the provider list, scroll down to find **custom endpoint (enter URL manually)**, type its corresponding number (such as `31` in the example) and press Enter. Because EvoLink provides an **OpenAI-compatible endpoint**, you connect via the "custom endpoint" option here.
The wizard will prompt you for the endpoint details in turn:
* **API base URL**: enter `https://direct.evolink.ai/v1`
* **API key**: enter your EvoLink API Key (starting with `sk-`, masked with `*` as you type)
* **API compatibility mode**: select **Chat Completions** or keep **Auto-detect \[current]** (just press Enter)
After you enter them, the wizard automatically validates the endpoint. If you see a message like `Verified endpoint via https://direct.evolink.ai/v1/models (169 model(s) visible)`, the endpoint is connected and the key is valid.
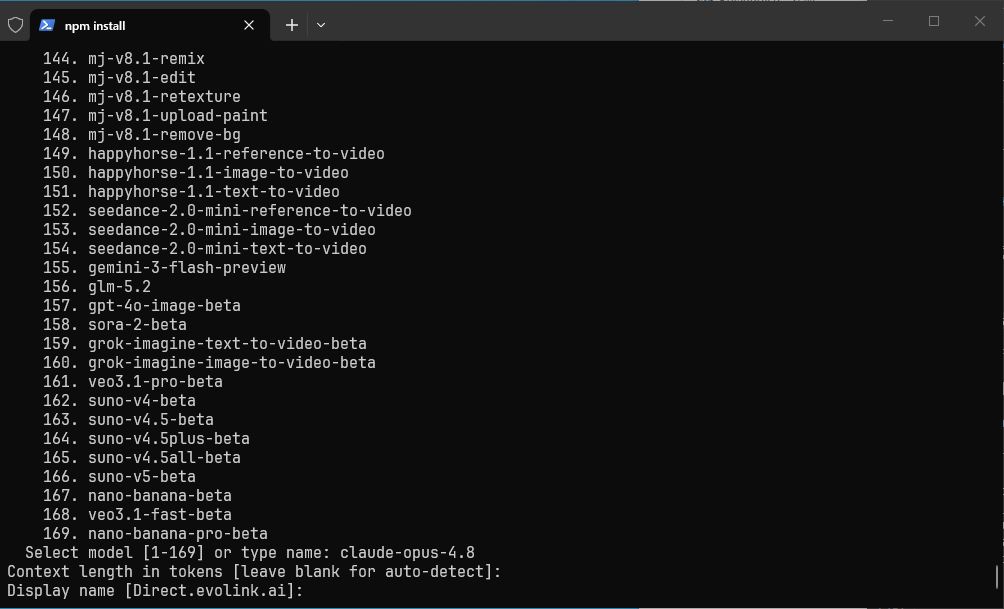
 At the `Select model [1-N] or type name:` prompt at the bottom of the model list, type the name of the model you want as the default (such as `claude-opus-4-8`, `claude-sonnet-4-6`, etc.) and press Enter. You can press Enter to accept the defaults for `Context length` and `Display name`.
 **Expected result:** After completing the wizard, an **Installation Complete** page is displayed, listing the configuration file locations on Windows (`config.yaml`, `.env`, etc. under `C:\Users\\AppData\Local\hermes\`) and common commands, and prompting you to **Restart your terminal for PATH changes to take effect**.
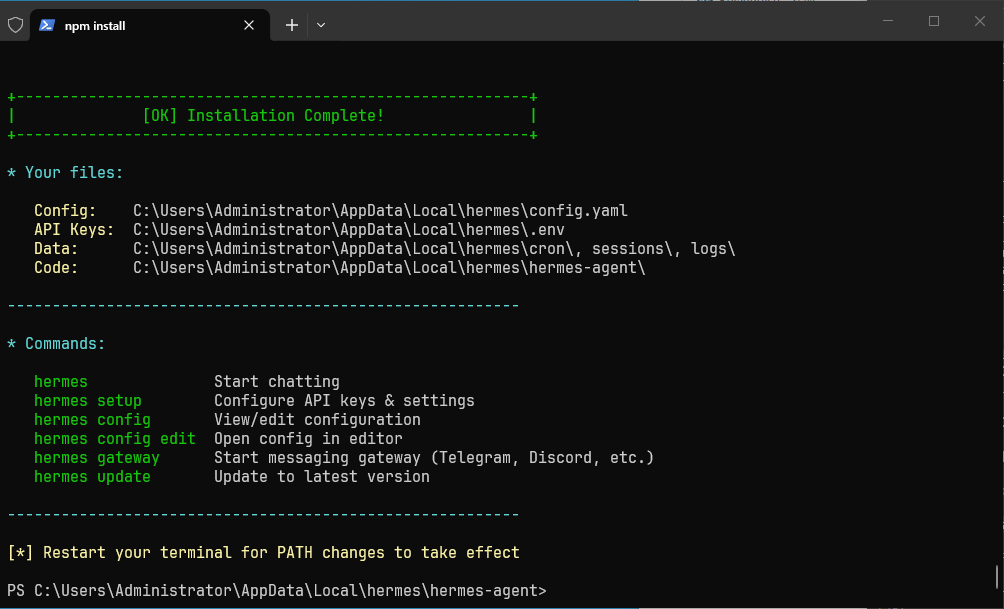 On Windows, this guide's configuration files are located in `C:\Users\\AppData\Local\hermes\` (rather than `~/.hermes/` on macOS / Linux). The `~/.hermes/.env` and `~/.hermes/config.yaml` referenced later in this guide correspond to the `.env` and `config.yaml` in that directory on Windows.
macOS and Windows users can also download the Hermes Desktop installer from the [Hermes website](https://hermes-agent.nousresearch.com) and install it with a double-click.
### Verify the Installation
Run the diagnostic command to check the installation status:
```bash theme={null}
hermes doctor
```
On Windows, this guide's configuration files are located in `C:\Users\\AppData\Local\hermes\` (rather than `~/.hermes/` on macOS / Linux). The `~/.hermes/.env` and `~/.hermes/config.yaml` referenced later in this guide correspond to the `.env` and `config.yaml` in that directory on Windows.
macOS and Windows users can also download the Hermes Desktop installer from the [Hermes website](https://hermes-agent.nousresearch.com) and install it with a double-click.
### Verify the Installation
Run the diagnostic command to check the installation status:
```bash theme={null}
hermes doctor
```
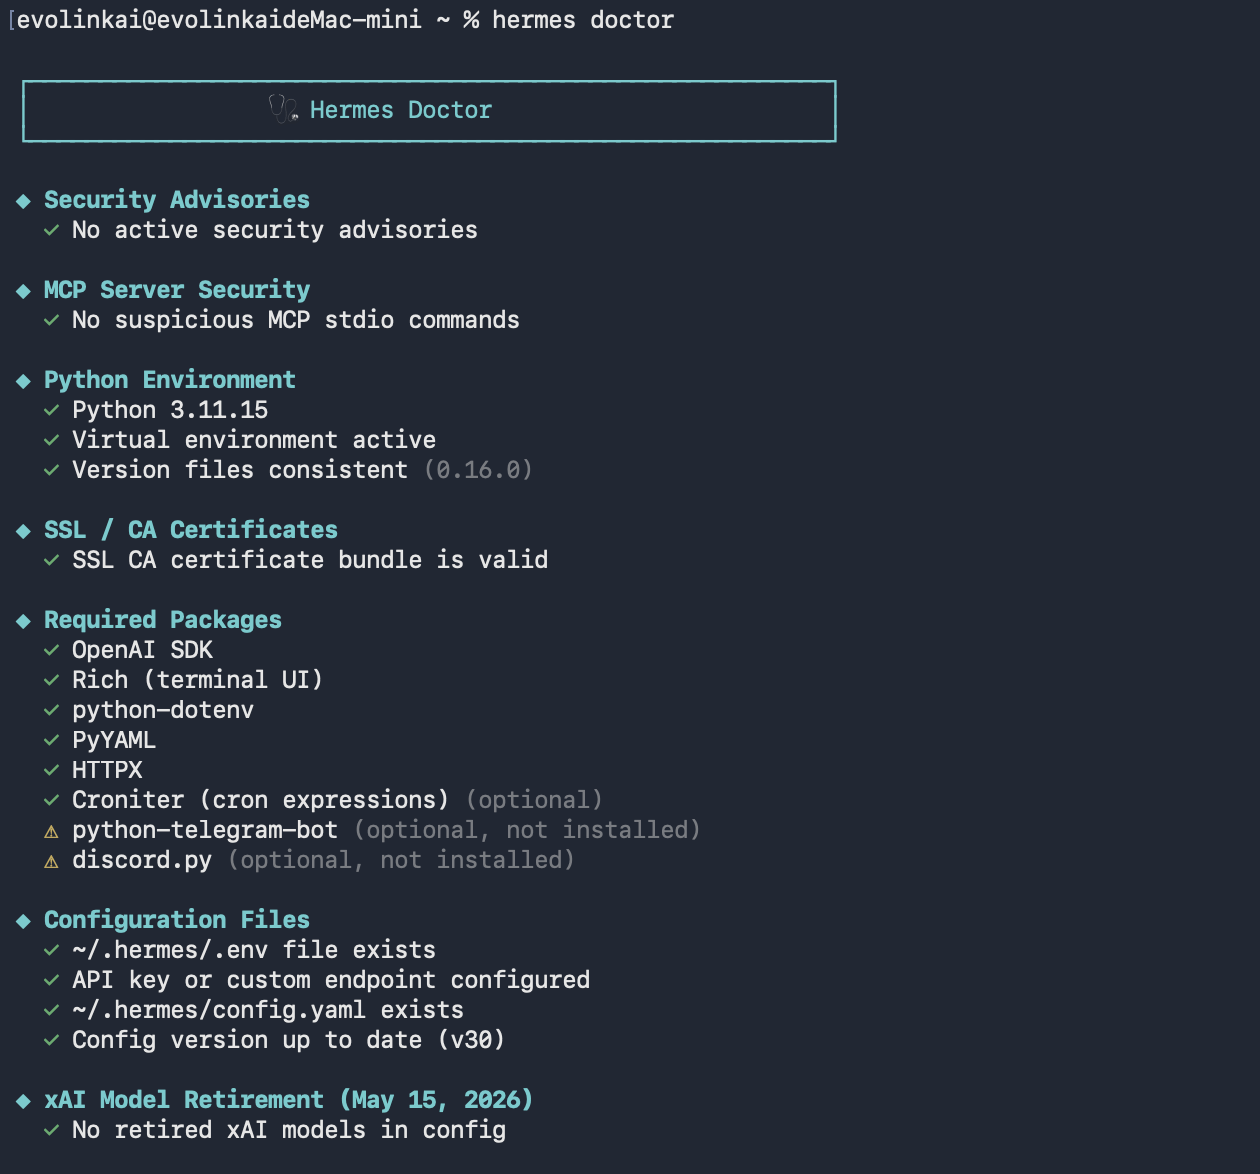
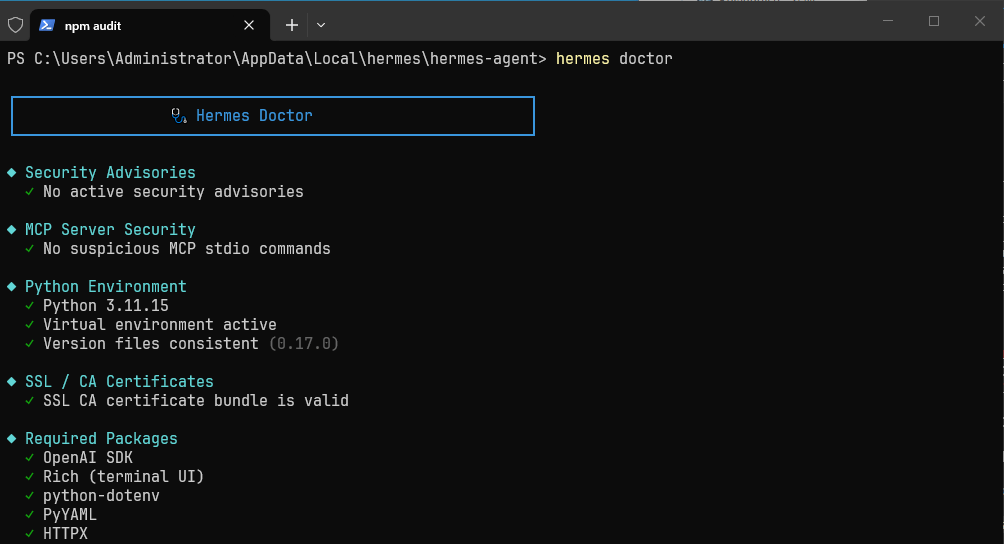 **Success indicator:** The environment check results are displayed, with no fatal installation-related errors reported.
To update to the latest version, run `hermes update`.
## Step 2: Configure the EvoLink API (Quick Users or Reconfiguration)
If you already completed the EvoLink integration via **Full setup** in Step 1 and passed endpoint validation, you can skip directly to [Step 3](#step-3-start-using-and-verify). This step is mainly for users who chose **Quick Setup**, or for scenarios where you need to reconfigure / switch models.
Hermes Agent is configured through files in the `~/.hermes/` directory, where:
* `~/.hermes/.env` — stores secrets such as API keys
* `~/.hermes/config.yaml` — stores non-secret configuration such as models and providers
Because EvoLink provides an **OpenAI-compatible endpoint**, we set Hermes' provider to `custom` (custom endpoint) with the endpoint URL pointing to `https://direct.evolink.ai/v1`.
Hermes provides an interactive setup wizard, suitable for new users (especially those who chose Quick Setup). Run in your terminal:
```bash theme={null}
hermes model
```
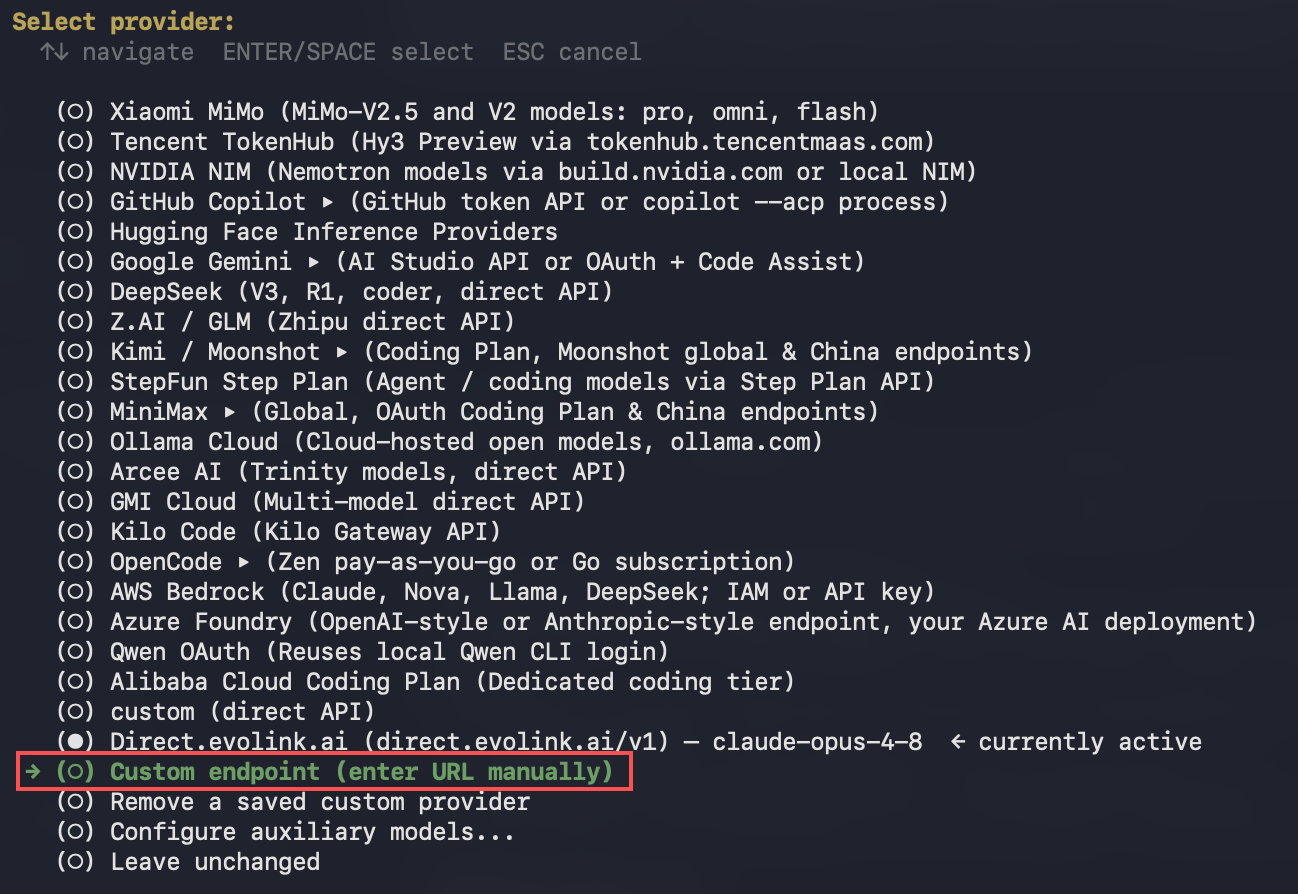
In the provider list, scroll down and select **custom endpoint (enter URL manually)** to connect to EvoLink's OpenAI-compatible endpoint.
**Success indicator:** The environment check results are displayed, with no fatal installation-related errors reported.
To update to the latest version, run `hermes update`.
## Step 2: Configure the EvoLink API (Quick Users or Reconfiguration)
If you already completed the EvoLink integration via **Full setup** in Step 1 and passed endpoint validation, you can skip directly to [Step 3](#step-3-start-using-and-verify). This step is mainly for users who chose **Quick Setup**, or for scenarios where you need to reconfigure / switch models.
Hermes Agent is configured through files in the `~/.hermes/` directory, where:
* `~/.hermes/.env` — stores secrets such as API keys
* `~/.hermes/config.yaml` — stores non-secret configuration such as models and providers
Because EvoLink provides an **OpenAI-compatible endpoint**, we set Hermes' provider to `custom` (custom endpoint) with the endpoint URL pointing to `https://direct.evolink.ai/v1`.
Hermes provides an interactive setup wizard, suitable for new users (especially those who chose Quick Setup). Run in your terminal:
```bash theme={null}
hermes model
```
In the provider list, scroll down and select **custom endpoint (enter URL manually)** to connect to EvoLink's OpenAI-compatible endpoint.
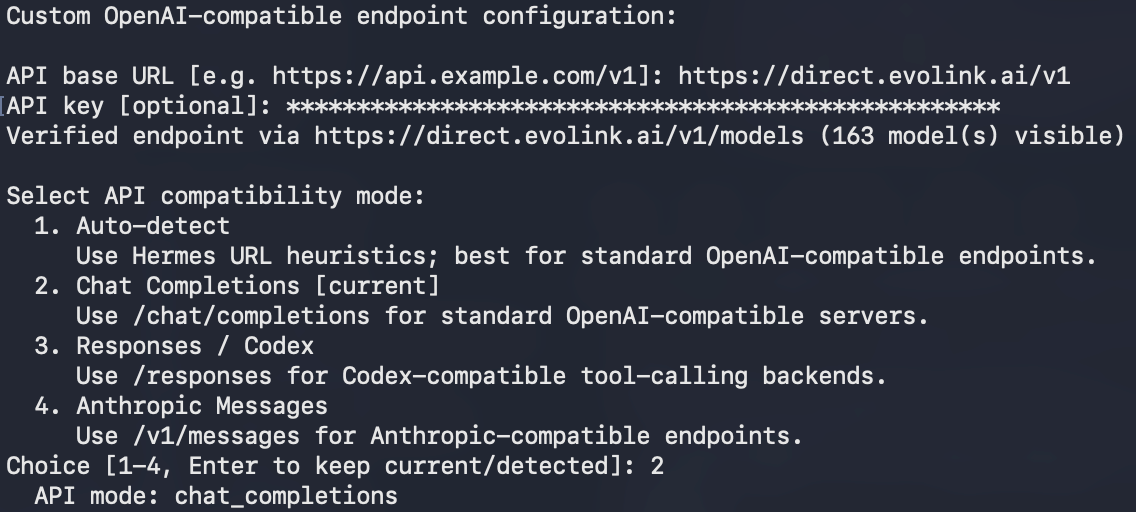
 Enter the endpoint details in turn, and after validation passes, select the API compatibility mode:
* **API base URL**: enter `https://direct.evolink.ai/v1`
* **API key**: enter your EvoLink API Key (starting with `sk-`)
* **API compatibility mode**: select **Chat Completions (standard OpenAI-compatible endpoints)**
Seeing a message like `Verified endpoint via https://direct.evolink.ai/v1/models (163 model(s) visible)` means the endpoint is connected and the key is valid.
Enter the endpoint details in turn, and after validation passes, select the API compatibility mode:
* **API base URL**: enter `https://direct.evolink.ai/v1`
* **API key**: enter your EvoLink API Key (starting with `sk-`)
* **API compatibility mode**: select **Chat Completions (standard OpenAI-compatible endpoints)**
Seeing a message like `Verified endpoint via https://direct.evolink.ai/v1/models (163 model(s) visible)` means the endpoint is connected and the key is valid.
 Finally, enter the name of the model you want as the default (such as `claude-sonnet-4-6`, `claude-opus-4-8`, etc.) and press Enter to confirm.
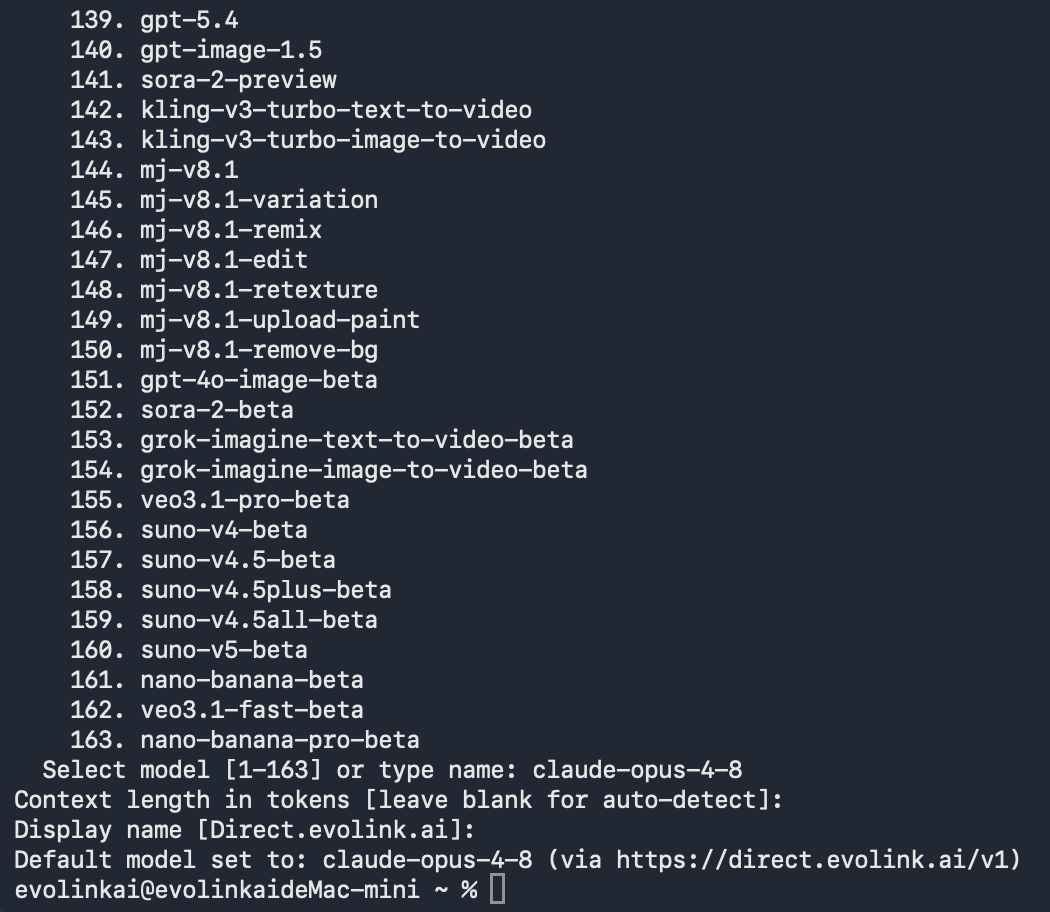 The wizard automatically writes the API Key to `~/.hermes/.env` and the model and endpoint configuration to `~/.hermes/config.yaml`, with no need to edit files manually.
`hermes model` is the most critical step for Quick users to connect EvoLink. Once done, you can proceed directly to the next step and start using it.
If you already have your EvoLink API Key, you can write the configuration directly from the command line.
### 1. Set the API Key (writes to .env)
```bash theme={null}
hermes config set OPENAI_API_KEY your_EvoLink_API_Key
```
### 2. Set the endpoint URL and model (writes to config.yaml)
```bash theme={null}
hermes config set OPENAI_BASE_URL https://direct.evolink.ai/v1
hermes config set model claude-sonnet-4-6
```
`hermes config set` automatically writes API-key-type secrets to `.env` and the remaining configuration to `config.yaml`, so you don't need to worry about which file it goes to.
Once done, run `hermes config` to check whether the current configuration is correct.
**Advanced users:** The following approach edits the configuration files directly. Most users are recommended to use the "Setup Wizard" above.
### 1. Edit \~/.hermes/.env
Open (or create) `~/.hermes/.env` and write in the API Key and endpoint URL:
```bash theme={null}
OPENAI_API_KEY=your_EvoLink_API_Key
OPENAI_BASE_URL=https://direct.evolink.ai/v1
```
### 2. Edit \~/.hermes/config.yaml
Open (or create) `~/.hermes/config.yaml` and configure the main model as a custom endpoint:
```yaml theme={null}
model:
provider: custom
default: claude-sonnet-4-6
base_url: https://direct.evolink.ai/v1
api_mode: chat_completions
```
**⚠️ Important notes:**
* Replace `your_EvoLink_API_Key` with your actual API Key
* `base_url` must be `https://direct.evolink.ai/v1` (EvoLink's OpenAI-compatible endpoint URL)
* Do not enter punctuation using a Chinese input method (such as the full-width colon `:`)
**Configuration item descriptions:**
* `provider: custom`: use a custom OpenAI-compatible endpoint (i.e., EvoLink)
* `base_url`: the EvoLink API endpoint URL
* `api_mode: chat_completions`: use the standard Chat Completions interface
* `default`: the default model name to use
## Step 3: Start Using and Verify
### 1. Launch Hermes Agent
```bash theme={null}
hermes # classic command-line mode
```
Or use the modern TUI interface (recommended):
```bash theme={null}
hermes --tui # modern terminal interface
```
### 2. Verify the Configuration
After launching, enter a simple prompt to verify, for example:
```
who are you
```
The wizard automatically writes the API Key to `~/.hermes/.env` and the model and endpoint configuration to `~/.hermes/config.yaml`, with no need to edit files manually.
`hermes model` is the most critical step for Quick users to connect EvoLink. Once done, you can proceed directly to the next step and start using it.
If you already have your EvoLink API Key, you can write the configuration directly from the command line.
### 1. Set the API Key (writes to .env)
```bash theme={null}
hermes config set OPENAI_API_KEY your_EvoLink_API_Key
```
### 2. Set the endpoint URL and model (writes to config.yaml)
```bash theme={null}
hermes config set OPENAI_BASE_URL https://direct.evolink.ai/v1
hermes config set model claude-sonnet-4-6
```
`hermes config set` automatically writes API-key-type secrets to `.env` and the remaining configuration to `config.yaml`, so you don't need to worry about which file it goes to.
Once done, run `hermes config` to check whether the current configuration is correct.
**Advanced users:** The following approach edits the configuration files directly. Most users are recommended to use the "Setup Wizard" above.
### 1. Edit \~/.hermes/.env
Open (or create) `~/.hermes/.env` and write in the API Key and endpoint URL:
```bash theme={null}
OPENAI_API_KEY=your_EvoLink_API_Key
OPENAI_BASE_URL=https://direct.evolink.ai/v1
```
### 2. Edit \~/.hermes/config.yaml
Open (or create) `~/.hermes/config.yaml` and configure the main model as a custom endpoint:
```yaml theme={null}
model:
provider: custom
default: claude-sonnet-4-6
base_url: https://direct.evolink.ai/v1
api_mode: chat_completions
```
**⚠️ Important notes:**
* Replace `your_EvoLink_API_Key` with your actual API Key
* `base_url` must be `https://direct.evolink.ai/v1` (EvoLink's OpenAI-compatible endpoint URL)
* Do not enter punctuation using a Chinese input method (such as the full-width colon `:`)
**Configuration item descriptions:**
* `provider: custom`: use a custom OpenAI-compatible endpoint (i.e., EvoLink)
* `base_url`: the EvoLink API endpoint URL
* `api_mode: chat_completions`: use the standard Chat Completions interface
* `default`: the default model name to use
## Step 3: Start Using and Verify
### 1. Launch Hermes Agent
```bash theme={null}
hermes # classic command-line mode
```
Or use the modern TUI interface (recommended):
```bash theme={null}
hermes --tui # modern terminal interface
```
### 2. Verify the Configuration
After launching, enter a simple prompt to verify, for example:
```
who are you
```
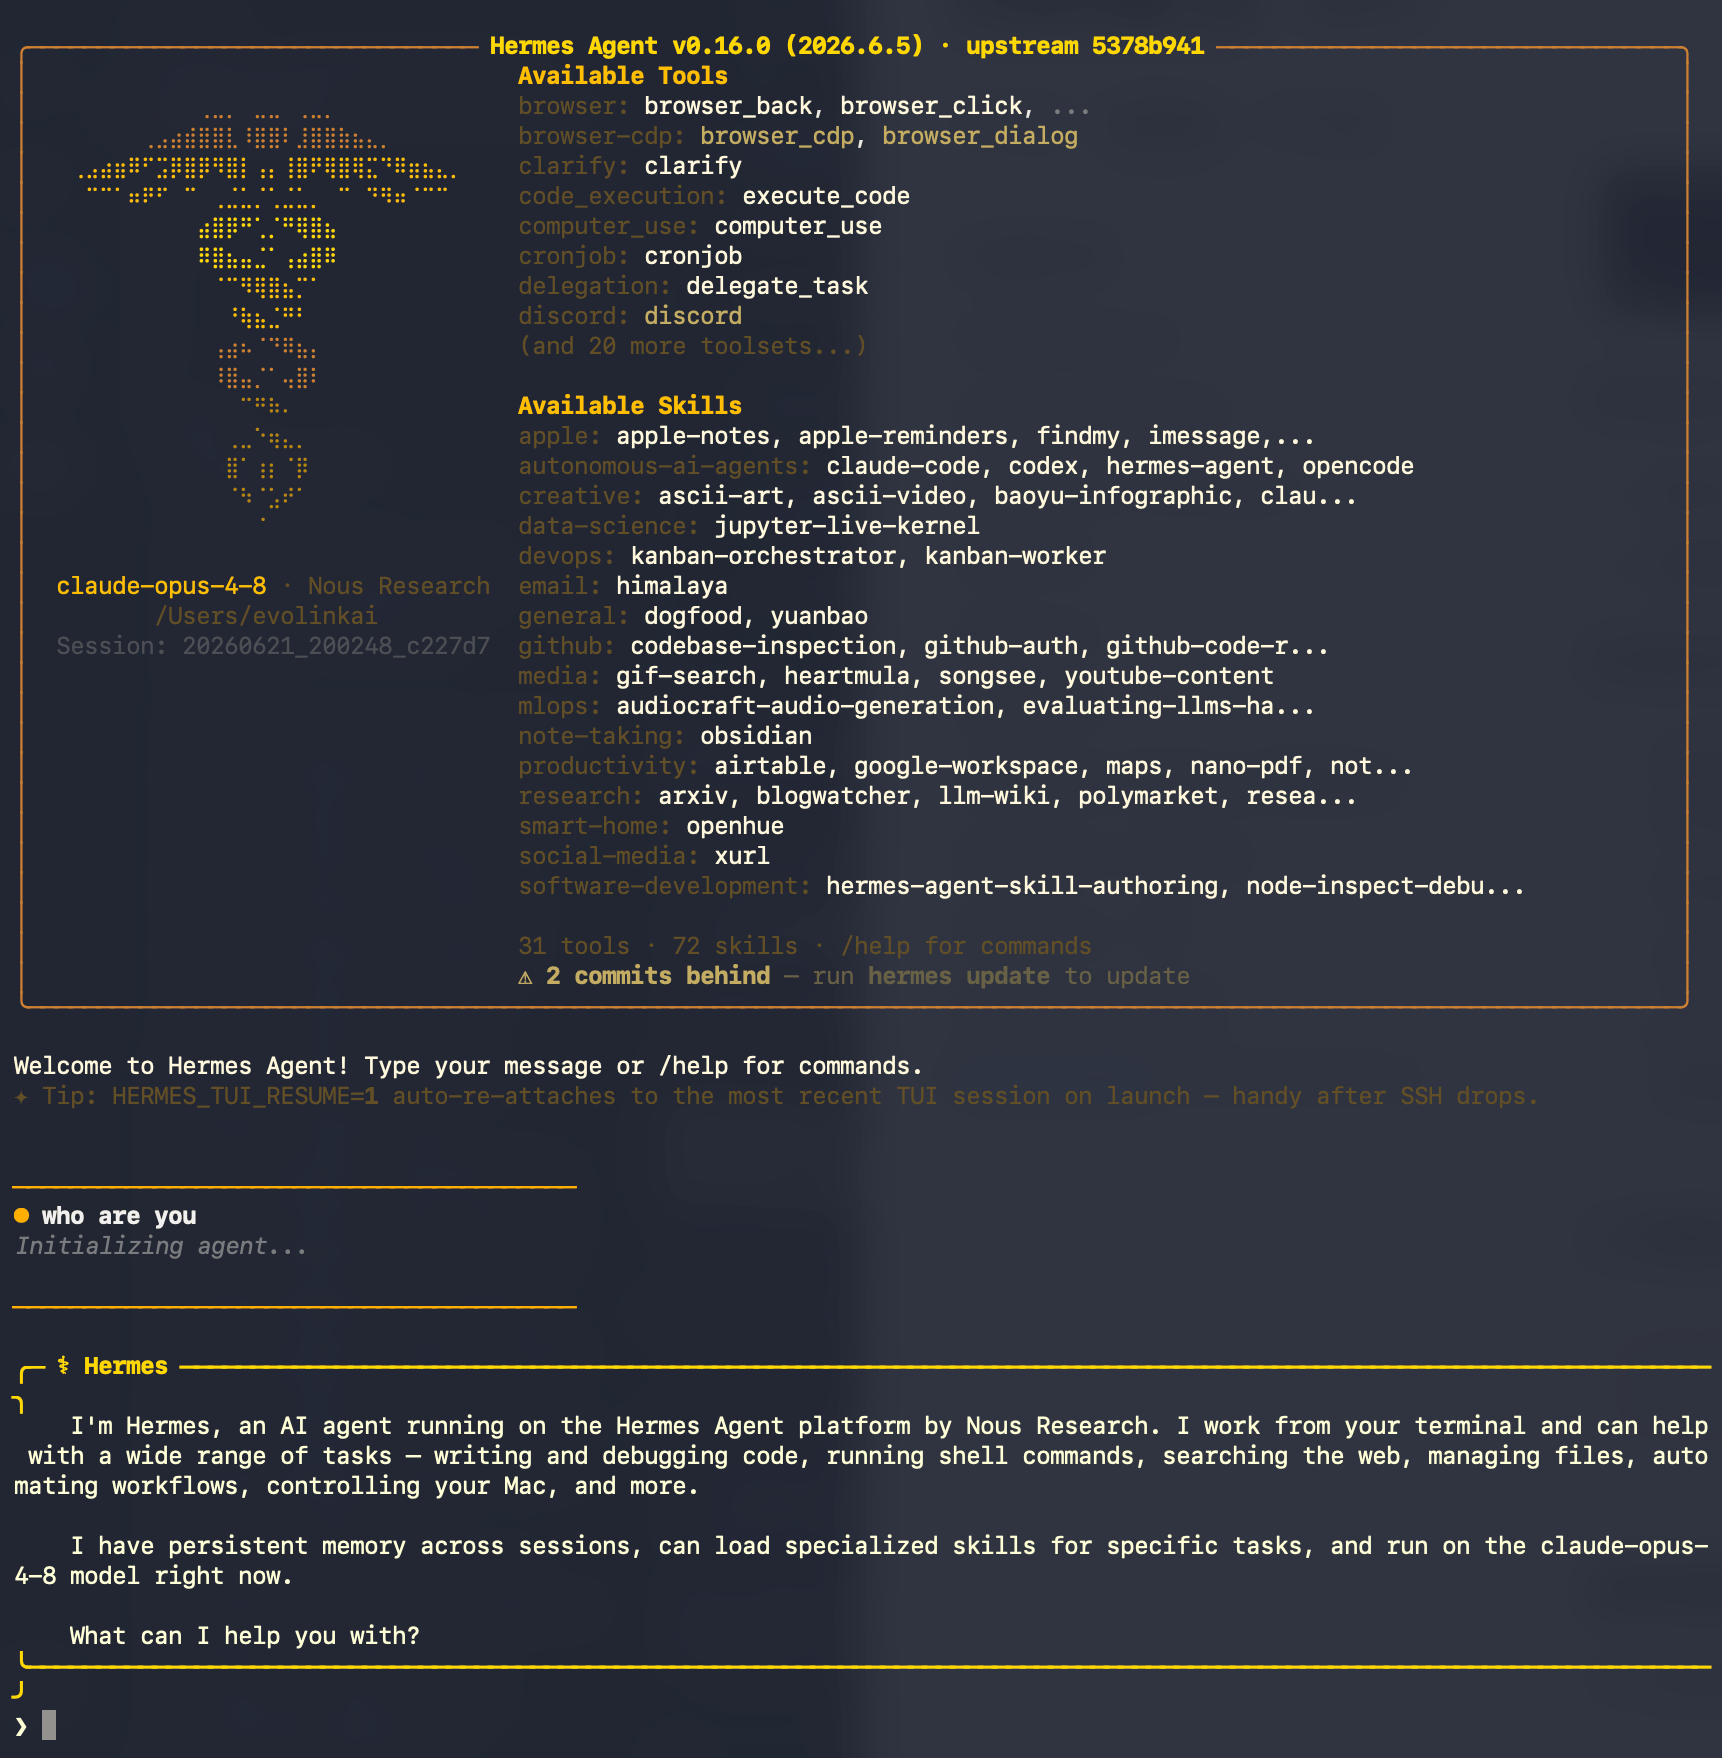 **Success indicators:**
* You see the AI's reply (a few lines of text)
* There are **no** errors such as `401`, `403`, invalid `API key`, or `context length`
**If you see an error:**
* `401 Unauthorized`: the API Key is not set or invalid → check `OPENAI_API_KEY` in `~/.hermes/.env`
* `403 Forbidden`: the API Key has insufficient permissions or has expired → check the API Key
* `context length` related errors: the selected model has less than 64K context → switch to a model that meets the requirement
* `No API key` / provider not found: no key found → run `hermes config set OPENAI_API_KEY ...` again
### 3. Resume a Previous Session
```bash theme={null}
hermes --continue # resume the most recent session
hermes -c # shorthand form
```
## Advanced Configuration (Optional)
The following configurations all edit `~/.hermes/config.yaml` (on Windows, edit the `config.yaml` file in the corresponding folder). Use them as needed.
### Fallback Models
When a request to the main model fails, Hermes can automatically switch to a fallback model without losing the current session. You can configure a fallback chain that all routes through EvoLink:
```yaml theme={null}
fallback_providers:
- provider: custom
model: claude-sonnet-4-6
base_url: https://direct.evolink.ai/v1
- provider: custom
model: claude-haiku-4-5-20251001
base_url: https://direct.evolink.ai/v1
```
### Auxiliary Models
Hermes uses "auxiliary models" to handle some secondary tasks (such as context compression, session titles, web summaries, etc.). By default it uses the main model, but you can route these to a cheaper/faster model to save costs:
```yaml theme={null}
auxiliary:
title_generation:
provider: custom
model: claude-haiku-4-5-20251001
base_url: https://direct.evolink.ai/v1
api_key: your_EvoLink_API_Key
compression:
provider: custom
model: claude-haiku-4-5-20251001
base_url: https://direct.evolink.ai/v1
api_key: your_EvoLink_API_Key
```
This way the main model focuses on complex reasoning, while lightweight tasks are handled by a cheaper model.
## FAQ
### 1. What is Hermes Agent? What is it mainly used for?
Hermes Agent is an open-source, terminal-native autonomous AI agent from Nous Research. It features persistent memory and self-created skills, and can handle coding assistance, task automation, Q\&A conversations, and more from the command line, while supporting integration with various chat platforms through a messaging gateway.
### 2. Are Hermes Agent and the Hermes 3 / Hermes 4 models the same thing?
No. Hermes **Agent** is an open-source command-line tool; Hermes 3 / Hermes 4 are Nous Research's large language **model** families. This guide covers the Hermes Agent tool, which can connect to a variety of model providers including EvoLink.
### 3. Why use `provider: custom` to connect EvoLink?
Because EvoLink provides a standard **OpenAI-compatible endpoint**. Hermes supports a variety of providers, and `custom` (custom OpenAI-compatible endpoint) is exactly the way to connect to this type of compatible interface. So in Hermes, connect EvoLink with `provider: custom` and set the endpoint URL to `https://direct.evolink.ai/v1`.
### 4. What should I do if I get a context length error at startup?
Hermes Agent recommends using a model with at least 64K tokens of context. Because the system prompt and tool definitions consume a significant amount of context, a window that is too small may fill up and leave no room for conversation, causing it to be rejected at startup. Please switch to a model with a larger context (such as EvoLink's Claude family).
### 5. What usually causes 401 / 403 errors?
* **401 error**: `OPENAI_API_KEY` is not set or the API Key is invalid
* **403 error**: the API Key has insufficient permissions or has expired
* Please check the key in `~/.hermes/.env`, and whether `base_url` is `https://direct.evolink.ai/v1`
### 6. Why didn't my configuration changes take effect?
* Confirm the configuration was written to the correct file: the API Key goes in `~/.hermes/.env`, and the model/endpoint goes in `~/.hermes/config.yaml`
* Run `hermes config` to see the configuration currently in effect
* Check whether the indentation and syntax in `config.yaml` are correct (YAML is indentation-sensitive)
* Restart Hermes
### 7. How do I switch models?
* Interactive: run `hermes model` to reselect
* Command line: run `hermes config set model model_name`
* Edit the `model.default` value in `~/.hermes/config.yaml` directly
### 8. Which common models does EvoLink support?
EvoLink supports the following Claude models (it also supports GPT, Gemini, and other families, which you can view in the console):
| Model name | Description |
| ---------------------------- | -------------------- |
| `claude-haiku-4-5-20251001` | Fast response |
| `claude-sonnet-4-5-20250929` | Balanced performance |
| `claude-opus-4-5-20251101` | Advanced version |
| `claude-sonnet-4-6` | Latest version |
| `claude-sonnet-5` | Latest version |
| `claude-opus-4-8` | Latest version |
| `claude-opus-4-7` | Latest version |
### 9. How do I check usage?
Log in to the [EvoLink console](https://evolink.ai/dashboard) to view request volume, consumption, and token usage.
### 10. Where are the configuration file and secret file located?
* Secrets (API Key): `~/.hermes/.env`
* Model and provider configuration: `~/.hermes/config.yaml`
* Run `hermes config edit` to open the configuration file for editing directly.
### 11. How to open a command-line terminal?
* Method 1: Press `Win + R`, type `powershell`, and press Enter
* Method 2: Search for "PowerShell" in the Start menu
* Method 3: Hold Shift in a folder, right-click an empty area, and select "Open PowerShell window here"
* Method 1: Press `Command + Space` to open Spotlight, type `Terminal`, and press Enter
* Method 2: Go to "Applications" → "Utilities" → "Terminal"
* Method 1: Press the `Ctrl + Alt + T` shortcut
* Method 2: Search for "Terminal" in the applications menu
## Notes
We recommend launching Hermes Agent inside a dedicated project folder, and avoid running it in sensitive directories (such as system directories or directories containing secrets). Hermes Agent is an autonomous agent and performs file operations starting from the current working directory.
For more usage and configuration, refer to the [Hermes Agent official documentation](https://hermes-agent.nousresearch.com/docs) and [GitHub repository](https://github.com/NousResearch/hermes-agent).
**Success indicators:**
* You see the AI's reply (a few lines of text)
* There are **no** errors such as `401`, `403`, invalid `API key`, or `context length`
**If you see an error:**
* `401 Unauthorized`: the API Key is not set or invalid → check `OPENAI_API_KEY` in `~/.hermes/.env`
* `403 Forbidden`: the API Key has insufficient permissions or has expired → check the API Key
* `context length` related errors: the selected model has less than 64K context → switch to a model that meets the requirement
* `No API key` / provider not found: no key found → run `hermes config set OPENAI_API_KEY ...` again
### 3. Resume a Previous Session
```bash theme={null}
hermes --continue # resume the most recent session
hermes -c # shorthand form
```
## Advanced Configuration (Optional)
The following configurations all edit `~/.hermes/config.yaml` (on Windows, edit the `config.yaml` file in the corresponding folder). Use them as needed.
### Fallback Models
When a request to the main model fails, Hermes can automatically switch to a fallback model without losing the current session. You can configure a fallback chain that all routes through EvoLink:
```yaml theme={null}
fallback_providers:
- provider: custom
model: claude-sonnet-4-6
base_url: https://direct.evolink.ai/v1
- provider: custom
model: claude-haiku-4-5-20251001
base_url: https://direct.evolink.ai/v1
```
### Auxiliary Models
Hermes uses "auxiliary models" to handle some secondary tasks (such as context compression, session titles, web summaries, etc.). By default it uses the main model, but you can route these to a cheaper/faster model to save costs:
```yaml theme={null}
auxiliary:
title_generation:
provider: custom
model: claude-haiku-4-5-20251001
base_url: https://direct.evolink.ai/v1
api_key: your_EvoLink_API_Key
compression:
provider: custom
model: claude-haiku-4-5-20251001
base_url: https://direct.evolink.ai/v1
api_key: your_EvoLink_API_Key
```
This way the main model focuses on complex reasoning, while lightweight tasks are handled by a cheaper model.
## FAQ
### 1. What is Hermes Agent? What is it mainly used for?
Hermes Agent is an open-source, terminal-native autonomous AI agent from Nous Research. It features persistent memory and self-created skills, and can handle coding assistance, task automation, Q\&A conversations, and more from the command line, while supporting integration with various chat platforms through a messaging gateway.
### 2. Are Hermes Agent and the Hermes 3 / Hermes 4 models the same thing?
No. Hermes **Agent** is an open-source command-line tool; Hermes 3 / Hermes 4 are Nous Research's large language **model** families. This guide covers the Hermes Agent tool, which can connect to a variety of model providers including EvoLink.
### 3. Why use `provider: custom` to connect EvoLink?
Because EvoLink provides a standard **OpenAI-compatible endpoint**. Hermes supports a variety of providers, and `custom` (custom OpenAI-compatible endpoint) is exactly the way to connect to this type of compatible interface. So in Hermes, connect EvoLink with `provider: custom` and set the endpoint URL to `https://direct.evolink.ai/v1`.
### 4. What should I do if I get a context length error at startup?
Hermes Agent recommends using a model with at least 64K tokens of context. Because the system prompt and tool definitions consume a significant amount of context, a window that is too small may fill up and leave no room for conversation, causing it to be rejected at startup. Please switch to a model with a larger context (such as EvoLink's Claude family).
### 5. What usually causes 401 / 403 errors?
* **401 error**: `OPENAI_API_KEY` is not set or the API Key is invalid
* **403 error**: the API Key has insufficient permissions or has expired
* Please check the key in `~/.hermes/.env`, and whether `base_url` is `https://direct.evolink.ai/v1`
### 6. Why didn't my configuration changes take effect?
* Confirm the configuration was written to the correct file: the API Key goes in `~/.hermes/.env`, and the model/endpoint goes in `~/.hermes/config.yaml`
* Run `hermes config` to see the configuration currently in effect
* Check whether the indentation and syntax in `config.yaml` are correct (YAML is indentation-sensitive)
* Restart Hermes
### 7. How do I switch models?
* Interactive: run `hermes model` to reselect
* Command line: run `hermes config set model model_name`
* Edit the `model.default` value in `~/.hermes/config.yaml` directly
### 8. Which common models does EvoLink support?
EvoLink supports the following Claude models (it also supports GPT, Gemini, and other families, which you can view in the console):
| Model name | Description |
| ---------------------------- | -------------------- |
| `claude-haiku-4-5-20251001` | Fast response |
| `claude-sonnet-4-5-20250929` | Balanced performance |
| `claude-opus-4-5-20251101` | Advanced version |
| `claude-sonnet-4-6` | Latest version |
| `claude-sonnet-5` | Latest version |
| `claude-opus-4-8` | Latest version |
| `claude-opus-4-7` | Latest version |
### 9. How do I check usage?
Log in to the [EvoLink console](https://evolink.ai/dashboard) to view request volume, consumption, and token usage.
### 10. Where are the configuration file and secret file located?
* Secrets (API Key): `~/.hermes/.env`
* Model and provider configuration: `~/.hermes/config.yaml`
* Run `hermes config edit` to open the configuration file for editing directly.
### 11. How to open a command-line terminal?
* Method 1: Press `Win + R`, type `powershell`, and press Enter
* Method 2: Search for "PowerShell" in the Start menu
* Method 3: Hold Shift in a folder, right-click an empty area, and select "Open PowerShell window here"
* Method 1: Press `Command + Space` to open Spotlight, type `Terminal`, and press Enter
* Method 2: Go to "Applications" → "Utilities" → "Terminal"
* Method 1: Press the `Ctrl + Alt + T` shortcut
* Method 2: Search for "Terminal" in the applications menu
## Notes
We recommend launching Hermes Agent inside a dedicated project folder, and avoid running it in sensitive directories (such as system directories or directories containing secrets). Hermes Agent is an autonomous agent and performs file operations starting from the current working directory.
For more usage and configuration, refer to the [Hermes Agent official documentation](https://hermes-agent.nousresearch.com/docs) and [GitHub repository](https://github.com/NousResearch/hermes-agent).